Showing posts with label Stencil of the Month. Show all posts

Tuesday, February 1, 2022

Antique Trellis with Brutus Monroe


Hello everyone!  I hope everyone is safe and doing well!  January is
over - YAY!  Closer to spring and warmer weather!  Today I'm sharing
a project made with some fun new products from

Brutus Monroe

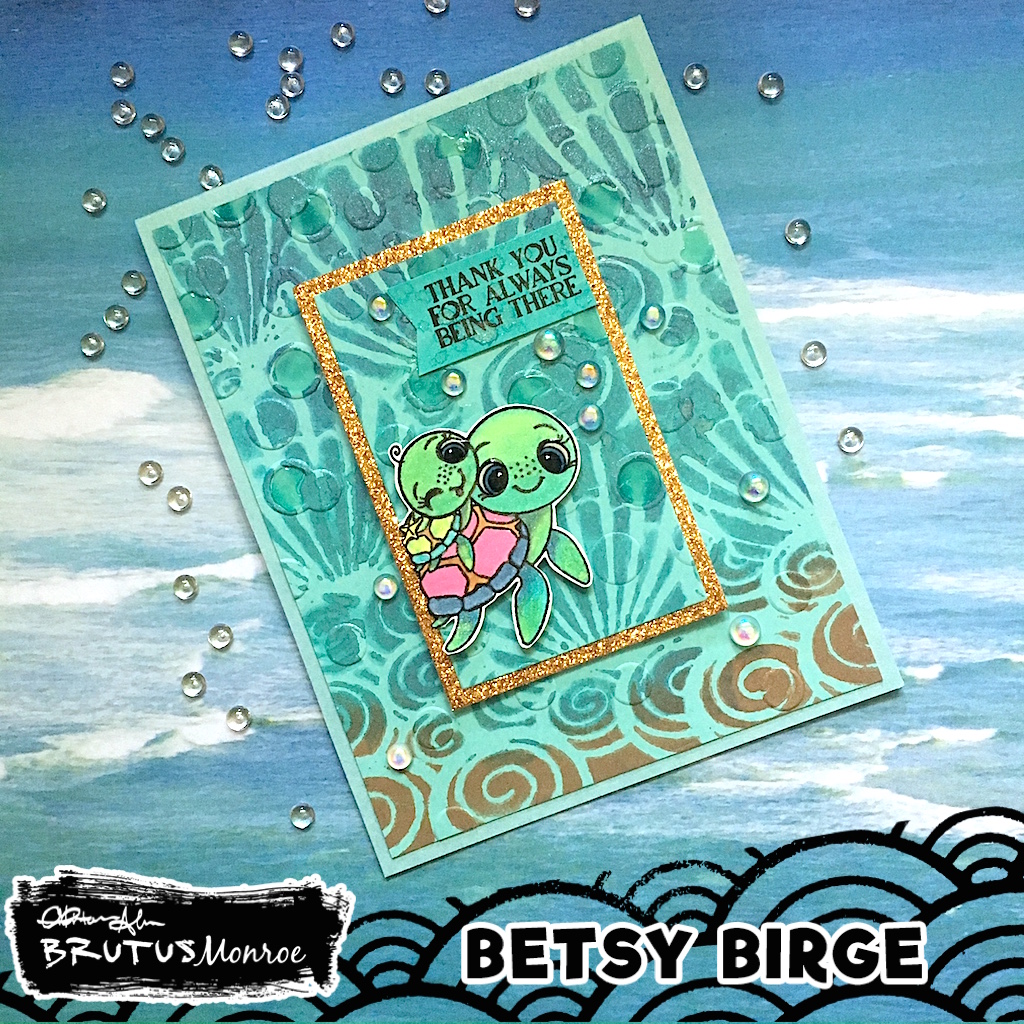
This mini slimline is deceptively simple but so full of sparkle and
shine!  Let me show you how I made my card!
First - I was able to use the new Stick & Stamp Mat!  This is an
absolute game changer!  It measures 6 1/2" x 8 1/2" and has a
tacky surface that can be used over and over.  And, because of the
convenient size - it fits into an Original MISTI!  Clean up is a
dream with Squeaky Clean Mat Mist.  I placed my stencil on
top of my card stock that was placed onto the Stick & Stamp Mat.


Because of the generous proportions of the mat, it allows all of the
edges of the stencil to stick to it.  So convenient.  Using a palette knife
I applied the Teal Candy Coat on top of the stencil.  The stencil comes
right off and by bending the mat, my card stock piece also came off.


Like many other Brutus Monroe mediums, Candy Coat when applied is
quite opaque.  The magic happens when it dries!  The base has fine
sparkle in it and there are pieces of iridescent flakes.  When it dries this
has so much sparkle and shimmer.  While that was off to the side drying,
I heat embossed my sentiment using the Simple Strips - Crafty using
Alabaster Embossing Powder and the coordinating die.


Next I made my mini slimline card base out of white card stock and
covered it with turquoise Glitterstock.  I added to that a black panel.
I cut down my dry stenciled panel.


After adhering the stenciled piece I popped up the sentiment on foam tape
and adhered to the middle of the card.  I tied a triple bow of turquoise silk ribbon
and adhered it to theft of the sentiment.  I took a Q-tip and went around the
edges of the ribbon with Alabaster Glitter Glaze.  And as a final bit of
shimmer I added a few pieces of iridescent confetti.  And that finished
my card!


I love working with extra sparkle this time of year because it's so
drab.  This new Candy Coat is over the top with sparkle!  Expect to
see more colors of this as 2022 progresses!!!  ðŸ’«. You can find
the products I used at

Brutus Monroe

The new Stick & Stamp Mat is at a great price point!  The stencil is
available through a subscription program as well as being able to 
just purchase it.
Thanks so much for stopping by!

Betsy

In my capacity as a design team member for Brutus Monroe, I do receive the products I use from them. 

All opinions and creative decisions remain my own, and I only work with companies/use products that I love.


Monday, January 18, 2021

Stamp & Stencil of the Month with Brutus Monroe


Hello everyone!  Today I'm sharing all kinds of crafty goodness from:


Both the Stamp and Stencil of the Month are adorable this month and all
are love-themed!  Let me show you how I made my cute shaker card!

I first taped a piece of hot press watercolor paper to a hardboard.  I used
Cosmo Hydrowash, just gently moving down the paper with a back and
forth brush stroke until I achieved the smooth look I was going for.


You can see it buckled my paper.  I let it dry completely before moving onto
the next step.  When it's dry, the paper is completely flat.  With the panel still
taped in place, I used Pixie Spray to adhere my Stencil down and used the
Glitter Glaze of the Month - Poppy! And then let it dry completely before moving on.


Once this was completely dry I removed it from the board and trimmed it to
3 5/8" x 5".  Next I stamped my image using Raven Detail Ink and my MISTI.


I colored the image with Copic markers.  For colors I used:
W0, W1, W3, W5, RV10, RV02. RV06, YR02, R02
When my coloring was complete I fussy cut the image out.


Using a heart die from my stash I die cut a heart from the stenciled panel.
I placed it in the center a bit closer to the top.  My particular die cuts a frame
as well as the main heart image.


I prepared an A2 size top folding white card base and adhered a cut panel
of white glitter paper to fit behind the heart shape.  Using the top stenciled
panel as a guide, I adhered my frame inside onto the white glitter paper.


I gathered the components for my shaker card.  Then I die cut the "Hugs" from
Christopher's Sentiments Cutting Die Set.  I used the white glitter paper for the
letters and black card stock for the backing and adhered them together.  I adhered
a piece of acetate behind the heart opening on the main panel and then placed
foam tape on the back, making sure I surrounded the heart with continuous tape.
Onto the base of the card within the framed heart I added my Mermaid Sequins -
Pink & Red, then I placed the top panel over it to secure the shaker.


I added my little bunny and then the Hugs die cut over it and colored in the very
centers of the little flowers with an orange glitter pen. I adhered the left over
evacuated heart die cut to the inside of the card. 
And my card was complete!


This card was so much fun to make!  With so many great products, cards come
out special every time!  If you haven't shopped 


lately - go now!  Lots of new products in stock and always something on sale!

As always I appreciate your time and interest!

Betsy


In my capacity as a design team member for Brutus Monroe, I do receive the products I use from them.

 All opinions and creative decisions remain my own, and I only work with companies/use products that I love.


Tuesday, November 10, 2020

Stencil of the Month with Brutus Monroe


Hello everyone!  Today I'm bringing you the latest


This stencil is gorgeous!  I chose to use Simon Hurley Inks on my project.
Let me walk you through how I made my card.

I first took a full size sheet of smooth white card stock.  I used a bit of Pixie
Spray on the back of my stencil.


This is with the stencil still on.


This was when I was finished with my ink blending.  I used Simon Hurley Inks
in:  Minty Fresh, Crown Me, Triple Berry and Remember Me.  I felt it
needed a bit of something in the center.


Using the Circle Star Stencil and the Remember Me Ink, I added a bit
of the center of that stencil keeping the edges soft.  I used the Pink & Main
Ergonomic Blending Brush for my stenciling.
Next I heat embossed my sentiment with Raven Sparkle Embossing
Powder.  My sentiment came from the Love You Floral Stamp Set.


I loved the whole look of this card...the soft stenciling and the subtle sparkle
of the sentiment.  I didn't use any other embellishments.  I mounted this on
a 6" x 6" purple panel and then mounted it all onto a 6" x 6" white card base!


I hope you like and are inspired by my card today!  Always so fun
to use products from Brutus Monroe:


The Stencil of the Month is a subscription product.  Once you sign up, you don't
need to worry about ordering it every month.  It will ship automatically right to
your door.  There are many other subscription products as well!

Thank you so much for stopping by today!  I appreciate your
interest and support!

Betsy

In my capacity as a design team member for Brutus Monroe, I do receive the products I use from them.

 All opinions and creative decisions remain my own, and I only work with companies/use products that I love.