Tuesday, April 26, 2022

Vintage Tile Take 2 with Brutus Monroe


Hello everyone!  Today I'm sharing another card made with


I wanted to see what the Chroma Glaze would do over an inked background.  I
am in love with the way it turned out!  Let me show you how I made my card!
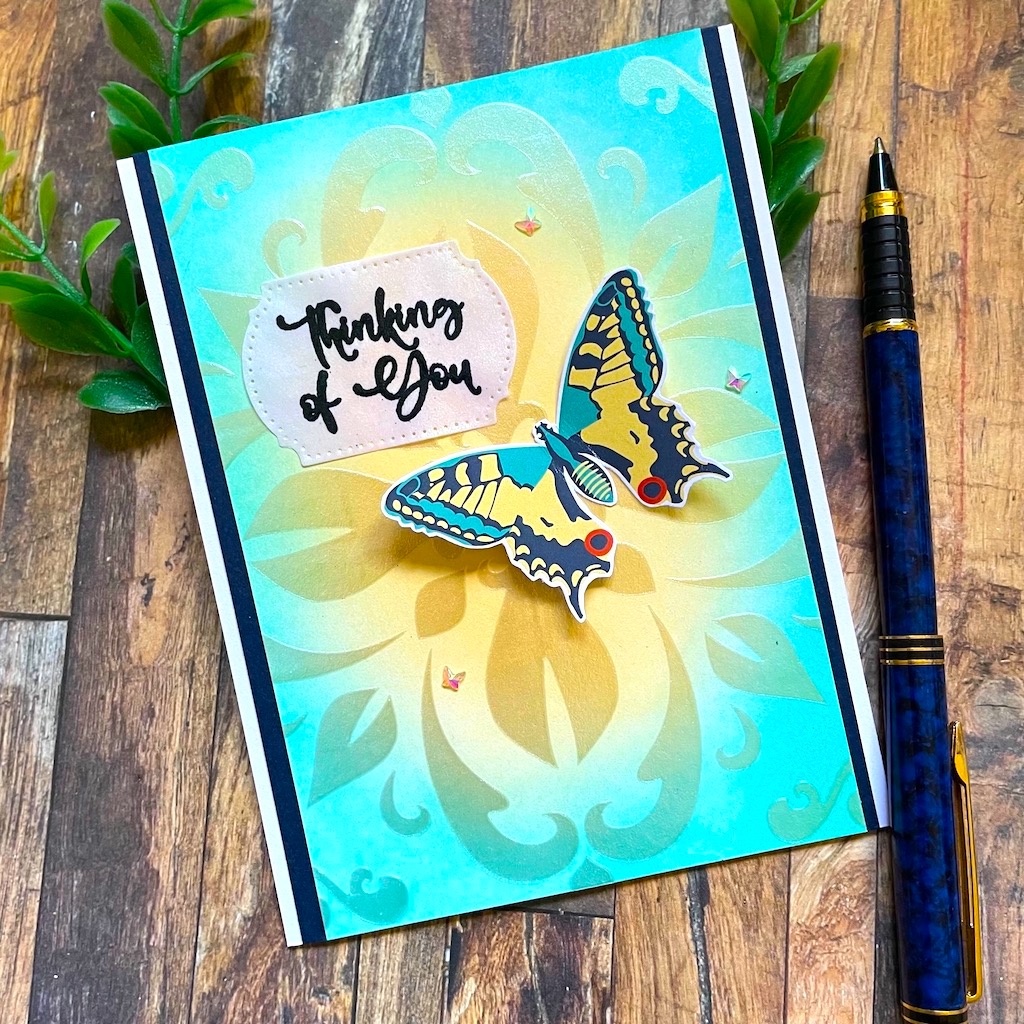
I first ink blended my A2 size card base panel on heavy white card stock.  I used Simon
Hurley Inks in Over the Moon and Tropical Tango using my Stick & Stamp Mat.


I was color matching this to a piece of patterned paper from the Bountiful
Blooms Paper Collection as I was going to fussy cut one of the butterflies.
Before this ink was dry I placed my Vintage Tile Mixed Media Stencil over
top of the panel and using Opal Chroma Glaze ( a new fav!!!) I
applied a very thin coat.


This did not blend with the ink as much as I thought it would, but that's ok.  I
didn't do a lot of smoothing out...I applied it, scraped it even with a palette
knife, took off the stencil, took my panel from my Stick & Stamp Mat and let
everything dry.  I chose the butterfly I wanted and fussy it out along with one
of the flowers and a few of the yellow leaves.


Next I took a piece of white pearlized vellum and heat embossed my sentiment
on it with Night Shift Embossing Powder in Teal...so pretty!  Once it was cooled
I die cut it with a small label die.


I made a standard white A2 size top folding card base from white card stock.  I
cut a piece of navy yardstick to 4" x 5 1/2" and adhered it, centered, on the
card base.


I cut my inked/stenciled panel flat to the card centering it.  It measures
3 7/8" x 5 1/2".  I adhered my butterfly by applying liquid glue just to the
center of it.  I adhered my sentiment in the upper left and used a bit of liquid glue
to adhere it.  Because this is pearlized you can't really see though it like
most vellum.  I adhered the red flower and 3 little leaves I had fussy cut from the paper
 inside my card.  For a finishing touch I adhered 3 tiny iridescent butterflies
and my project was done!


This was fun to create and I love experimenting with different mediums.  I
really love this Opal Chroma Glaze over the ink.  It's so pretty!  You can find
the products I used for this card at


Thanks so much for stopping by and hanging out here today!

Betsy

In my capacity as a design team member for Brutus Monroe, I do receive the products I use from them. 

All opinions and creative decisions remain my own, and I only work with companies/use products that I love.


Sunday, April 24, 2022

Extraordinary with Joy Clair Designs


Hello everyone! Spring is here and soon the bees will be buzzing about!  So, today I'm sharing with you a beautiful card made with

Joy Clair Designs

 Extraordinary Digital Stamp Set  

This is such a gorgeous set and the images are quite different than you might expect...I love them all!  Let me show you how I made my card!  I started by composing my image and sentiment in the computer and printing it out onto Neenah 80lb Solar White card stock.

Even before I started to color my image I wanted to die cut it.  I used a pierced rectangle die set.  I chose the die in the set that is 3 1/4" x 4 1/2".  These dies are made by Sizzix.

 There is not a large area to color, so I wanted to make sure my image popped on my card.  I did this by using bright colors.

I used Copic Markers for coloring.  For the bee I used Y02, Y08, Y17, Y38, YR04.  I used 2 different green mixes for the 2 different types of leaves.  I used YG11 & YG63, and YG06 & G14 for the other.  I used Blue Violets for the flowers - BV000, BV02 and BV13.  For the wings I used: B0000, RV00, YG0000, V01.  For just a bit of added brightness to the flowers I glazed them with RV10 and RV63.  I set that piece aside to work on the background.  Using a honeycomb stencil and Mustard Seed Oxide ink and the new Stick & Stamp Mat from Brutus Monroe, I stenciled an A2 size panel.

Once it was dry I used a die from the same pierced set that was 4" x 5 1/4".

To give this piece just a bit of depth, I used a YR21 Copic Marker and shaded the bottom half of each of the hexagons.  This was not deep shadowing, just enough so you know it's there.

Now I was ready to assemble my card.

I adhered the stenciled panel to my white A2 size top folding card base.  I adhered my main panel by adding a piece of adhesive foam the back.  I added shimmer to the wings of the bee and the flowers.

So hard to catch a photo of shimmer!  It's so pretty!  I also added some yellow gems around my image.  And that finished my card for today!

This stamp set is available at

 Joy Clair Designs 

and there are 2 other images included as well!  It's one of my favorites!  

Thanks so much for spending time here today!  I really appreciate it!

Betsy

In my capacity as a design team member for Joy Clair Designs, I do receive the products I use from them. 

All opinions and creative decisions remain my own, and I only work with companies/use products that I love.

Thursday, April 14, 2022

Modern Duets with Joy Clair Designs


Hello everyone!  Today I'm bringing you a card made with a very versatile digistamp set from

Joy Clair Designs

Modern Duets Bundle

This set has flowers - solid and outlined.  And leaves to fill out your bouquet.  Let me show you how I made my card!  I first started with arranging my flowers in a pleasing bouquet.  I used 4 different flowers and repeated one.  I made them different sizes and turned and flipped them!  The joys of digital stamping!  I printed off my floral arrangement and sentiment - which came from the Just Butterflies digital stamp set.  I printed this out onto hot press watercolor paper.

I had already planned to fussy cut the image but I was unsure at this point about the sentiment. So I cut the sentiment away from the flowers so I could paint the flowers.  I decided to use Karin Markers. I chose 2-color blends for 4 flowers using the yellow blend twice..

I started with my Blue/Purple flower.  I scribbled color out onto my glass mat and picked it up with a damp paint brush after wetting the area with clean clear water.

I moved onto my yellow flowers next.  These were Yellow and Red Violet for shading.

The Pink/Orange one was next.

And the Magenta/Purple one was last.

The leaves were the last thing that I painted.  I used a mix on each leaf of Lime Green, Dark Green, Purple, Yellow and Orange.

While I was waiting for that to dry I die cut my sentiment with a fish-tailed banner die.

And I colored in the letter with a Pentel Sparkle Pop Pen in Gold.  This gold pen is actually a sparkly gold pen - not just metallic gold.  I fussy cut the bouquet leaving a small white border.  I prepared a white mini slimline card base that when folded measures 3" x 6".  Using a die from the Big & Little Chain Rectangle Mini Slimline Dies I cut another white panel.  Using a brush stripe stencil from my stash I stenciled the stripes using Antique Linen Distress Ink.  I then assembled all of my card parts.

I adhered the stenciled pattern onto my card base.  After trimming my sentiment on the left side I aligned it with the tiny dot detail of the stencil.  I knew my fish-tailed end would get covered.  I wanted to fill in the bigger holes in the stencil with something, but like the stenciling, I wanted it to be neutral.  I used very tiny black gems - I get these in the fingernail art section on Amazon.  I really liked how they made the stenciled panel look.

I popped up my flower focal with foam and that completed my card!

I hope you enjoyed today's card project!  I really liked thinking beyond what I normally do.  It often brings unexpected joy!  Find the stamps and die set I used at

Joy Clair Designs

Thanks so much for stopping by today!

Betsy

In my capacity as a design team member for Joy Clair Designs, I do receive the products I use from them. 

All opinions and creative decisions remain my own, and I only work with companies/use products that I love.

Tuesday, April 12, 2022

Bountiful Blooms with Brutus Monroe


Hello everyone!  I'm bringing you a bit of spring today - at least in
my card!  I'll be using new products from


How cute is this card!  This stamp set is chock full of images to make the
cutest scenes!  It comes in the April 2022 Inspiration Box!  Let me show you how I 
made my card!  I started with the fence.  I used the Fence Builder Die Set and  Farmhouse
 Grain card stock.  I used the long piece twice and I die cut 7 smaller posts.  Using the
Stick & Stamp Mat I placed these on and then painted them with Brown
Aqua Pigments.


I was also using the Stick & Stamp Pigment Palette while making
my project.  It was very handy.  These looked too pale to me so I added a
touch of Black Aqua Pigment to the Brown.  Then, when they were
completely dry, I ran Simon Hurley's woof! ink pad over the pieces.
This really picked up the woodgrain texture in the paper!


I set those aside and chose the stamps I wanted to work with.  There are
33 stamps in this set!  I used waterproof ink and Aqua Pigment Paper.


I knew I would be fussy cutting these so it didn't matter where I stamped 
my images.  Still using the Stick & Stamp Mat with the Pigment Palette,
I started painting my images.  I used Yellow Orange, Green, Tinsel Blue,
Red, Brown, Black and White.


I did some mixing of colors for an orange, purple and skin tone.


I set those aside to dry before fussy cutting them.  Next I cut a panel
of watercolor paper that was 4 1/8" x 5 3/8".  Once again I put this on my
Stick & Stamp Mat.  With my Tinsel Blue Aqua Pigment I painted
across the top two thirds of the page.  While it was still went I went 
across the bottom with the Green mixed with some Yellow Orange.
I used sideways brush strokes to do these and I didn't overwork these
areas.


Once that was dry I stamped my sentiment.


I adhered my fence down first.  I placed the horizontal posts and then adhered
my vertical posts spacing them evenly across the panel.


Next I adhered my other little elements.


I felt the grass area needed some texture so I made little grass blades with my
paintbrush and the same green mixed with yellow.


After that was dry I popped up the panel on foam and attached to a Buttercream
card stock base.  Then I popped up my Garden Lady and attached her to the
card.  For a bit of embellishment, I used Fallen Snow Glitter Glaze and a
Q-tip and made little dots of it around the flowers and watering can.  I also added
a little bit to the butterflies and the bird.
And that finished my card!


I hope you enjoyed today's tutorial.  This stamp set has so many stamps
and matching dies that you could make so many little scenes and cute cards!
Find the products I used to day at


Thanks so much for stopping by today!

Betsy

In my capacity as a design team member for Brutus Monroe, I do receive the products I use from them.

 All opinions and creative decisions remain my own, and I only work with companies/use products that I love.


Tuesday, April 5, 2022

Vintage Tile with Brutus Monroe


Hello everyone!  Today I get to share a new stencil technique with
you featuring products from 


This was tons of fun to put together.  It was in experiment for me - I stenciled
my panel 3 times!  Let me show you how I made my card!
I first started by placing a panel of white card stock on my Stick & Stamp Mat.
I used Simon Hurley's breakup blue ink and the Delicate Floral Stencil.


This is such a pretty stencil on it's own.  Next I overlaid the Vintage Tile
Stencil and used Glitter Glaze in Periwinkle.


I was very careful about placement of this stencil.


This came out so pretty!  I love the Delicate Floral design in the background.
Once this Periwinkle Glitter Glaze was dry, I rotated my stencil and used
Alabaster Glitter Glaze to stencil again.


I had to peel off my panel each time I stenciled so I could clean off my Stick
& Stamp Mat.  Then I just set my panel aside to dry.  When t was dry I
cut it to 4" x 5 1/4" and adhered it to a Blue Ribbon Card Stock panel that
was cut to 4 1/8" x 5 3/8".  I next moved onto my sentiment.  I used the
"Thanks" die set from Christopher's Sentiments dies.  I die cut the actual letter from 
the Blue Ribbon Card Stock and the shadow layer from some very
white vellum and adhered the 2 together.


I felt I needed a sub-focal so using Icicle Embossing Powder, I used one of
the butterflies from the Full Bloom Stamp Set and die cut it with the
coordinating dies.  I stamped the butterfly, heat embossed it and then ink
blended over it with the breakup blue ink.


I die cut the butterfly and then added Periwinkle Glitter Glaze for
some sparkle.


I adhered my prepared panel onto an A2 size white card base.  I adhered
my sentiment piece flat to the card.


I adhered my butterfly above the sentiment on the right.  As a last
finishing touch I added some iridescent confetti and
my project was finished!


I hope you enjoyed today's tutorial.  It was fun to see what would happen
when stenciling the same panel 3 times!  I love the effect!  You can purchase the
products I used at


Thank you so much for spending time with me here today!

Betsy

In my capacity as a design team member for Brutus Monroe, I do receive the products I use from them. 

All opinions and creative decisions remain my own, and I only work with companies/use products that I love.


Perfect Peony with Polkadoodles

  Hello everyone!  Today I'm bringing you more Spring goodness with this gorgeous digital stamp set from Polkadoodles Perfect Peony Digi...