Tuesday, March 29, 2022

Love Grows Here with Brutus Monroe


Hello everyone!  Today I'm sharing this sweet little card using products from

Love Grows Here

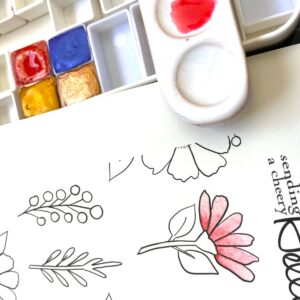
This is one of the new little stamp sets at Brutus Monroe.  I love this set!  It's small but
there's so much you can do with it.  Let me show you how I made my card.  I started
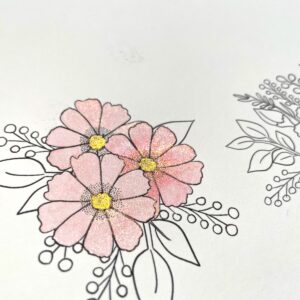
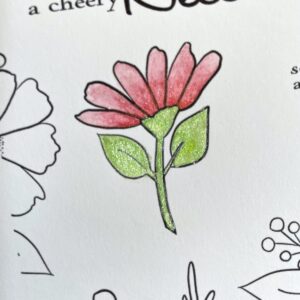
by stamping my 3 plant images 3 times each with black waterproof ink.


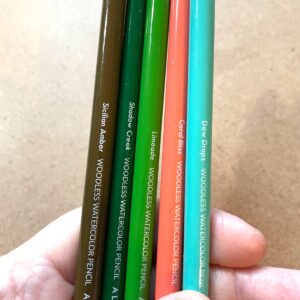
Using Chroma Mists, I chose a color palette of Turquoise, Orange and Lime
Green.  I didn't do anything but lay in color - no shading.  I started by
painting in the leaves.


Next I moved onto the orange parts and I added yellow for the flowers
in the pots.  I was keeping in mind how I was going to place these on 
my card panel.


I added the Turquoise last.  I didn't add extra water to the Chroma Mists
before painting with them.  I used a damp brush, not wet and I always
spray the Chroma Mists out onto my glass mat and pick up color with
my paintbrush.  After the painting was done and dry I fussy cut the images.


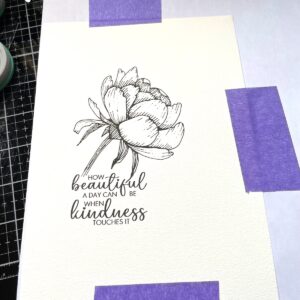
I knew I wanted my sentiment on a heart but I didn't have a die that the sentiment
fit on.  I took a piece of copy paper and folded it in half.  I laid my stamp on it for
measurement and drew a half heart and then cut it out.  This would be my
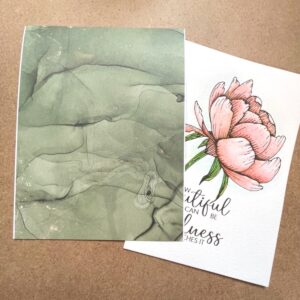
template for the heart.  I took a scrap piece of watercolor paper and sprayed it
with a bit of water.  I then dropped in the 3 colors I wanted to use.  The colors
don't moved a lot on their own, but by tilting the paper and using a brush
just a bit, I was able to get the colors to blend just a little.  I really needed to
keep the Turquoise away from the Orange. 


Once this was completely dry, I used the template I had made from copy
paper and drew the heart and cut it out.


Next I stamped the sentiment in the middle with black ink.


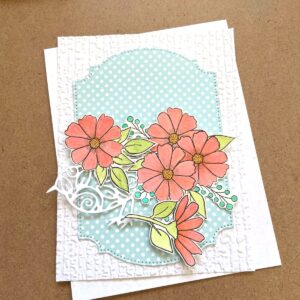
I applied foam tape to all of the pieces except one pot of flowers.  That would be a
left over that I would adhere inside the card.  I cut a white panel that measures
4" x 5 1/4" and applied my pieces where I wanted them placed.  I was mindful
of the way I painted them to get my colors right.  I foam mounted this panel onto
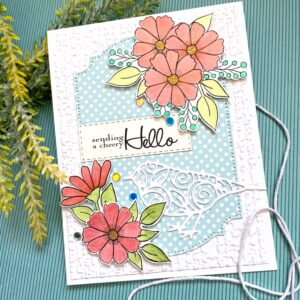
a standard A2 size top folding card base.  I added some confetti that was in
the same colors as the Chroma Mists and my card was done!


I really enjoyed making this card.  It's quite simple but I love the
bright summery colors against the white background.  You can find
the products I used at


Thank you so much for stopping by and spending time here!

Betsy

In my capacity as a design team member for Brutus Monroe, I do receive the products I use from them. 

All opinions and creative decisions remain my own, and I only work with companies/use products that I love.


Tuesday, March 22, 2022

Ladybug Roses with Brutus Monroe


Hello everyone!  Today I'm bring you a bit of bright spring with
products from

Brutus Monroe

Nothing says ladybugs than bright red!  I chose to make my mini slimline card
in that bright red!  Let me explain how I made my card!  I started by cutting
my red card stock to 2 3/4" x 6".  I like my finished mini slimline cards to
measure 3" x 6 1/4".  This red panel would be what I stencil on.  Using my Stick
and Stamp Mat I laid down my piece of red card stock, then my stencil.  I
wanted to stencil the ladybugs first.  I used Post-it tape as a mask to cover any spots 
that were too close to where I wanted to stencil.  I mixed Chroma Mists with some white
texture paste.  To make black I mixed all the colors I have of Chroma Mists on my
glass mat and mixed them with the texture paste.  I had my doubts because when
I mixed this it came out a gray sludgie purple.  ðŸ˜±. I went for it anyway.
Imagine my surprise that when it dried, it came out quite black!


I was so surprised that this came out so black!  After this was dry, I
scraped off what little texture paste actually got on my Stick and Stamp Mat
and repositioned the stencil.  I mixed Yellow Orange Chroma Mist with
the texture paste and stenciled the roses.  Once again I used Post-it tape to
mask off areas that were close enough for me to mess up!


I was spreading this texture paste quite thick.  I wanted the colors to really
stand out and not have a red shadow to them.  Once the yellow was dry I
laid the stencil back on and stenciled the dotted trail with Yellow Green Chroma
Mist and the texture paste...once again masking off any areas that were already
stenciled.


After the green was dry I took my panel off the Stick and Stamp Mat and
ran my scissors up the sides of the panel just to get rid of any texture paste
that was hanging out the side.  I took a scrap of the red card stock and
heat embossed in black my sentiment.  Then I cut it down so it would
fit in the lower right corner of my panel.


I made my base from Buttercream Card Stock and cut a panel that was
about 1/8" smaller in Key Lime card stock.


I adhered the stenciled panel onto this base.  I felt my yellow roses could use
a bit of brightening up so I took some straight Yellow Orange Chroma Mist
and painted each point of the roses.  This just darkened those edges a little bit
and made them stand out a bit more.  I used a shimmer pen on the ladybugs
and on the roses.  I added some tiny yellow iridescent stars and added my
sentiment with foam tape.  I felt there needed to be a bit of definition between the red card
 stock and the Key Lime so I added some thin black peel-offs.  And that completed my 
sweet ladybug card!


This stencil is so cute and you could do so much with it.  You can find the
products that I used for this card at

Brutus Monroe

Thanks so much for spending time here today!

Betsy

In my capacity as a design team member for Brutus Monroe, I do receive the products I use from them. 

All opinions and creative decisions remain my own, and I only work with companies/use products that I love.


Monday, March 14, 2022

Spring Rose with Joy Clair Designs


Hello everyone!  Today I'm bringing some spring inspiration!  I'm using the beautiful

Joy Clair Designs

 Spring Rose Digital Stamp Set  

This is such a beautiful stamp. I loved working with it and you can make it simple or create a repeating pattern.  Let me show you how I made my card.  I first started by composing my image and sentiment in the computer.  I printed it out onto copy paper.  Then I taped a piece of watercolor paper to the copy paper making sure the watercolor paper was positioned to where I wanted the image to print.

I had decided to use watercolor pencils for this project.  I used woodless watercolor pencils but you could use whatever you have.  I chose a very limited palette.

I started with the flower.  I did a fairly light coat of the coral.  I tried to keep my strokes following the form of the section that I was painting.

Using a light hand with this color allowed me to add more color later.  I next added the green.  I put on the dark first then added the lighter green where I wanted my highlights.

After finishing up the green I added the brown color with another layer of the pink - dry - then went in with my damp brush and softened the colors.

I also very lightly went around the flower with the blue and then blended it out.  I feel this made the flower stand out a bit more.  I chose a piece of green paper for my background.  I prepared a standard A2 size white top folding card base and adhered the green paper leaving a very thin margin of white on either side.

I adhered my flower panel onto the green.  For finishing I added 2 black peel-offs - one down either side of the green and I added some pretty sparkly confetti.  And that finished my card!

I loved working with this stamp.  It's so pretty and elegant.  I hope I've inspired you to create something pretty today!  You can find this beautiful digital stamp and many more at

Joy Clair Designs

Thank you so much for stopping by!

Betsy

In my capacity as a design team member for Joy Clair Designs, I do receive the products I use from them. 

All opinions and creative decisions remain my own, and I only work with companies/use products that I love.

Tuesday, March 8, 2022

Shine On with Brutus Monroe


Hello everyone!  Spring is on it's way!  I was in the mood to make something shiny 
and this Shine card fit the bill!  I used products from:


This is a fairly simple card but packs a powerful shine!  Let me show you how I made
it!  

Monday, March 7, 2022

Floral Joy with Joy Clair Designs


Hello everyone!  Today I'm sharing this beautiful digistamp set called Floral Joy from Joy Clair Designs.  I was really taken with the floral clusters in this set and I wanted them to the the focus of my card!  Let me show you how I did it!  I printed out the images in my computer onto a piece of 90lb watercolor paper.  This seems to go through my printer well and because it's 90lb it also fussy cuts easily.

I die cut the patterned bird out of regular white card stock and decided to use the dotted piece of card stock as a basis for the flowers and bird.  I wanted to paint the flowers with a coral shade and I had recently purchased a pan of paint from ZahraAmmarArt on Etsy.  Not only was it coral, but it was a shimmer paint as well!  I started painting the flowers and I was mindful of the black outline of the print-out.  I eventually had to darken up my lines.  This paint is quite saturated with color!

I went over the flowers several times to make sure I had nice coverage.  The full shimmer takes effect when the paint dries.  I used the gold for the centers of the flowers.  

I had a handful of dot cards and I used a green from one of them for the leaves. 

For the berries I used a teal that matched the polka dot paper I was using.  After everything was dry I fussy cut the images.  I took a panel of white card stock and used a textured embossing folder and I die cut my polka dot panel and my sentiment.

I adhered my textured panel to a white A2 size top folding white card base.  Next I adhered flat my die cut panel with liquid adhesive.  I adhered the sentiment and the bird flat.  I popped up the floral clusters on foam tape.  For embellishments I added a few bits of confetti.

This card came together so nice and easy!  And it's very springy!  I hope I've given you some inspiration to make something beautiful today!  

Thank you so much for stopping by!

Betsy

In my capacity as a design team member for Joy Clair Designs, I do receive the products I use from them. All opinions and creative decisions remain my own, and I only work with companies/use products that I love.

Tea Party with Kate Hadfield Designs

  Hello everyone!  It's time for a tea party and I'm using products from Kate Hadfield Designs Tea Party Digital Stamps This was so ...