Every day greeting cards and how they are created with step-by-step instructions.
Tuesday, February 23, 2021
Monday, February 22, 2021
Monday, February 15, 2021
Thursday, February 11, 2021
Monday, February 8, 2021
Thursday, February 4, 2021
Wednesday, February 3, 2021
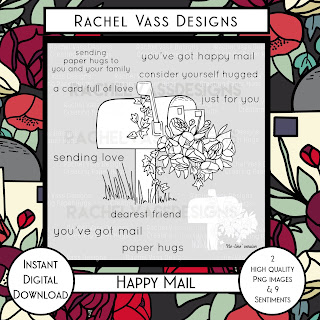
Happy Mail with Rachel Vass Designs
Hello everyone! Thanks for joining me today as we kick off the February Release at
What a cute set and so appropriate for the times we are living in! So
many great sentiments!
Let me show you how I made my card.
I first chose the patterned paper for the background. I wanted to color match
my image to the paper.
I had decided on a mini slimline, so my white base measures
6 1/4" x 3".
My paper came from an older Doodlebug Paper Pad and I liked the colors
that were bright but didn't necessarily scream spring...definitely not spring where I live!
Copic markers used:
Pink Flowers: RV02, RV55, RV17, RV63
Flag & stamps: BG49
Leaves & grass: YG00, YG03, YG23, YG25
Mailbox: C0, C2, C3
Post: Y15, Y28
I cut my background paper to 2 3/4" x 6" and matted it onto a dark blue
card stock that was 1/8" bigger all the way around. I decided to separate my image
from my sentiment and I backed these both with the same dark blue card stock.
I adhered all of that together, but before foam taping it to my base, I tied some
thin green twine between the main image and the sentiment. Then I added a
small lime green heart also from Doodlebug. I placed foam tape on the back
of the panel and adhered it to my white base and my card was done!
This was a cute easy card to make! You could color match it to any of
your favorite patterned papers!
Please visit:
She has many other wonderful digistamp sets! Questions on how to use
digistamps? Ask me - I'll be more than happy to help!
Thanks so much for stopping by today! I hope
you are inspired!
Betsy
In my capacity as a design team member for Rachel Vass Designs, I do receive the products I use from them.
All opinions and creative decisions remain my own, and I only work with companies/use products that I love.
Tuesday, February 2, 2021
February Release Blog Hop Day 2 w/Joy Clair Designs
Hello carmakers and Joy Clair Designs fans!!! Today is Day 2 of the February
Release Blog Hop & Giveaway!
You can hop along with us for your chance to win a $25 gift card to Joy Clair Designs store, valid for Digital and Clear Stamps. The hop will end on Feb. 3rd @ 11:59 PM EST. Winners will be announced on the Joy Clair Designs Blog between February 4th - 9th . The release is live now, so happy shopping!
This is another beautiful digital stamp set from the February 2021 Release!
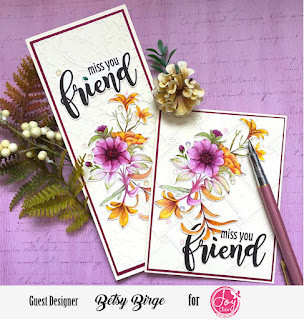
It's called "Spring Bouquets". Let me show you how I made my card!
I first printed my card onto Neenah 80lb Classic Crest Solar White card stock. I printed
the design out in gray - not black.
You can tell by the way the design is drawn that the shading lines are already
drawn in. This is so helpful when coloring and pretty much assures you that
your card will be shaded correctly! I thought at first that I might color this with
the new Pantone Colors of 2021 - gray and yellow. But it wasn't coming
together when I was testing my colors. I definitely wanted gray leaves, but I
finally decided to go with pink/burgundy.
I started by coloring my leaves.
I loved how these came out! See that smooge under the flower? I just
colored it with colorless blender about 4 times and it was gone - whew!
The more I colored these leaves, the more I loved them! Next I moved
onto the flowers.
Although you can still see the gray lines from the printing, it isn't as
harsh as black would have been. I loved the effect.
Copic markers used:
Leaves: W0, W1, W3, W5, W7
Flowers: RV000, RV0, RV21, RV55, RV17
Flower Centers: RV55, RV17, R39, R89, W7
After my coloring was completed I trimmed my panel and I cleaned up
my edges on my coloring with an Arteza white gel pen 0.6. These are
the best white gel pens I have ever used. I mounted my card onto a
gray slimline card base that measures 3 1/2" x 8 1/2". I added
some flat back silver foiled gems around the leaves and
my slimline card was finished!
If you haven't hopped along yet there's still time!!!! There's a nice prize
for this hop!
This "Spring Bouquets" is only one of the beautiful designs released for
February at Joy Clair Designs!
Make sure you comment and hop along with us!
Thanks so much for stopping by. I hope you have found some
inspiration!
Betsy
Monday, February 1, 2021
February Release Blog Hop with Joy Clair Designs
Hello everyone! I am so excited to be a part of the February Release
Blog Hop and Giveaway at Joy Clair Designs!
I chose the "Forever Friends" set to create my first cards. I changed my mind a lot throughout
the process of making these. I was going to make one slimline card and it did not
come together the way I had imagined...on to Plan B!
I printed out my design onto hot press watercolor paper twice. I changed the color
of the flower sprays to gray and the sentiment to a very deep violet. I knew the color
palette I wanted to use so changing the color of the printing was helpful.
My plan for the slimline was to paint these images, cut them out, flip them
so one would cover the top half and one would cover the bottom half with the
sentiment in-between. I wanted to watercolor these images and I used
the September 2019 Love From Lizi card kit as my palette inspiration. It's
obviously a fall palette but I was ready for some rich color! Enough already
with the winter and the snow!!
I painted these together - as opposed to painting one to completion and then going
on to the next one. I painted my largest flower first. This is the main focal point of
the spray.
I also painted the violet buds and then moved onto the gold flowers. I painted
in layers not using a lot of water.
I used the same darker colors for shading on both flowers.
I tried to balance out my colors. There were 7 flowers/buds. I painted 3
in the plum color and 4 in the gold.
I used green and plum on the leaves near of the plum flower.
I made one stem of leaves the gold color and one set in the plum color.
Watercolor Palette:
Aussie Red Gold
Bright Violet
Scarlet Lake
Olive Green
Stil de Grain
Yellow Ochre
Quinacridone Magenta
I added a few colors here and there to deepen and brighten. And then I fussy
cut my images - including the sentiment.
I cut a piece of medium colored plum card stock to put on my cream colored
slimline base. This is where things went in a different direction! Although
I liked how it looked, sort of, when I put the pieces against the ivory color
it was beautiful! And I felt that the 2 images were too busy for the slimline
card - so I made 2 cards. On top of the ivory bases - one slimline base and
the other an A2 size top folding made from Neenah 80lb Classic Crest Cream
card stock, I cut a panel for both cards 1/8" smaller out of plum card stock.
This is a Hero Arts card stock called Plum...so pretty! I also printed and cut
another sentiment for the second card. I cut 2 panels of the cream card
stock - one 3" x 8" and the other 4" x 5 1/4". I embossed these panels to give
a bit of texture and interest to the background.
I adhered my flowers and sentiment with liquid glue to the cards. As an
embellishment I used clear iridescent sequins and gems.
I hope you'll hop along with us as we introduce the February Release! I am
so loving this Forever Friends set! Please comment for your chance to win!
Stay tuned for Day 2!
Thank you so much for stopping by and visiting! I hope my project has
inspired you to create something beautiful!
Betsy
Subscribe to:
Posts (Atom)


