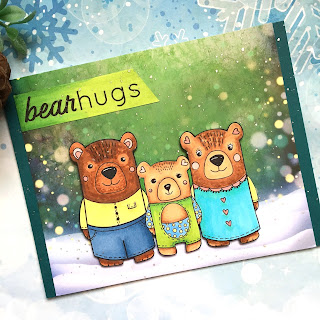
Hello everyone! Today I'm sharing my last card from the February Release from
This is such a cute set and jam-packed full of images and sentiments!
Let me show you how I made my card!
I chose my image and sentiment, sized them and printed them out onto
Neenah 80lb. Classic Crest Solar White card stock.
I also chose my background paper which is from Lavinia. I started with the
coloring of the bears first.
I kept the baby bear quite light in color.
I colored the mama bear in medium tones.
The papa bear had the darkest fur tones.
Copic colors used:
Yellow: Y11, Y21
Teal, BG01, BG23
Blue: B93, B95, B97
Green: YG03, G14
Light Blue: B23
Baby Bear: E51, E53, E31, E33, E35
Mama Bear: E31, E33, E35, E37
Papa Bear: E33, E35, E37, E47
Cheeks/Ears: R20, R22
Sentiment Flag: YG03, G14
Once my bear family was colored I fussy cut it right up to the black
line. My base is an A2 size top folding card base turned sideways.
I used a dark teal to entirely cover the front and then added the panel
of patterned paper. I adhered my bear family and the sentiment flag
with foam tape and then I added sparkle by splattering Liquid Pixie Dust
all over! Once that was dry I added white gel pen to their noses and eyes
and using a fine black liner I made stitching lines on the clothes.
I hope you enjoyed today's tutorial. These designs could be used for many
different occasions. Please be on the look out on March 3rd for the
newest release from:
I hope you enjoyed today's tutorial! If you have any questions regarding
either my process or just working with digistamps in general, please don't
hesitate to ask me questions!
Betsy
In my capacity as a design team member for Rachel Vass Designs, I do receive the products I use from them.
All opinions and creative decisions remain my own, and I only work with companies/use products that I love.


No comments:
Post a Comment