Tuesday, October 25, 2022

Baked Fresh - Pumpkin Pie with Brutus Monroe


Hello everyone!  I don't know about you, but I love pumpkin pie!  I
don't make good piecrust so I don't get to have it that often - only when 
someone else makes it! LOL  Today I'll be using products from


I really wanted to incorporate some blue into my project today.  It
looks so good with oranges and yellows.  Let me show you how I made
my card.  I started by taking 2 heavyweight A2 size white card stock panels.
I took one and smooshed it in Turquoise Chroma Mist.  I added water to 
my mat and kept smooshing and when it was still wet I splattered it with
full strength Chroma Mist.  I did the same with Tangerine Orange on
another piece of card stock.  After smooshing it in just plain Tangerine
Orange, I added a bit of Candy Apple Red and Ornament Gold.  I kept smooshing
until I was happy with the coverage.  Then I splattered with it with the 3 colors.
After they were dry, I cut them into strips - 3/4" for the Turquoise and 1/4"
for the Tangerine Orange.


Next I heat embossed with dark brown ink my elements from the
Baked Fresh Stamp Set.


I decided to color these with my Copic Markers.


For colors I used:  YR31, YR07, YR15, E08, E31, B00, B01, B02
After they were colored I fussy cut them.  I took a piece of creamy
yellow card stock from my stash and made an A2 size card base and
I cut a panel that was 4" x 5 1/4" and ran it through a dotted embossing
folder. 


 I took the largest piece of left-over card stock with the
Turquoise smooshing on it and heat set my sentiment from the
Baked Fresh Stamp Set with the dark brown ink.  Then I die cut it
with a banner die.


To put my card together I layered all of the background pieces together
inserting a piece of plain white card stock between the 2 yellow ones.  I
made a criss-cross pattern with my cut strips.  I popped up my elements
with foam tape including the sentiment banner.  I had to cut the right end
of the sentiment banner off because it was too long and that made a nice
flag for the top left of the card.  I put Glossy Accents on the whipped cream.  
I added two-tone pearls and that finished this card!


I love how this card turned out.  I really like how the Turquoise strips
are very much like an autumn sky with clouds!  It went so well with the 
sentiment!  You can find the products I used at


Thanks so much for stopping by!

Betsy

In my capacity as a design team member for Brutus Monroe, I do receive the products I use from them. 

All opinions and creative decisions remain my own, and I only work with companies/use products that I love.


Tuesday, October 18, 2022

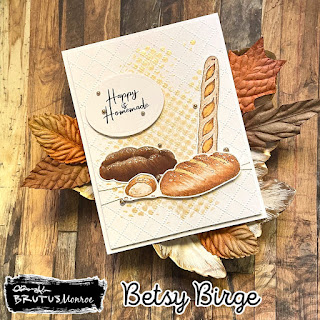
Baked Fresh with Brutus Monroe


Hello everyone!  I don't know about you, but I love the smell of fresh baked
bread!  That warm yummy smell just hits the spot!  So today I'll be using
products from


I tried something a little different with this card.  I stenciled over an embossed
background!  It wasn't perfect but I like it!  Let me show you how I made it!
I first cut a panel of White Wash card stock to 4" x 5 1/4"and embossed it with an 
embossing folder from my stash.  Then I put it on my Stick and Stamp Mat
and used the Circles Stencil and Gold Chroma Glaze.  I didn't want full
coverage so I didn't put it all over my panel.  But what did happen was the
panel had raised edges from the embossing and in places it left almost a
double circle look.  I really liked the look it gave.


While I was waiting for that to dry, I stamped my elements for my card
from the Baked Fresh Stamp Set with some soft brown Copic-friendly ink.
I stamped my sentiment in dark brown pigment ink away from the other
elements so I could die cut it.


For the coloring of my elements I Google Imaged "Artisan Bread".  This
gave me the imagery that I needed for color.  I used various browns and tans and a
bit of desaturated yellow for the breads. 


 I also tried to give the bread some visual texture, so my coloring
was not straightforward.  I did some dotting and left areas without much
color.  I was fairly happy with how they looked.  I fussy cut these out and
die cut the sentiment with an oval die.


My stenciled panel was dry.  I made a card base using the same White Wash
card stock.  It's an A2 size top folding base.  I put foam behind my stenciled
panel and before laying it down I added some gold thread and wrapped it around
the lower part of the card.


You can see the thread is not straight.  I added this for a slight
grounding of the elements, but not representative of a surface like
a table top.  I adhered 2 of the breads flat to the surface but popped up
the one in the front on foam tape as well as the sentiment.  I added
some light chocolate pearls that really reflect the gold stenciling and thread .
As a last bit of detail, I added just a few white hi-lites with a white
Posca Pen and then with a fine black marker added black dots that
resemble poppy seeds.  And my card was done!


I really like how this card came out.  I love the gold Chroma Glaze with
the colors of the breads and I think they enhance each other.  The Baked
Fresh Stamp & Die Set are part of October's Inspiration Box.  You can
find the products I used at


Thanks so much for stopping by!  I hope I've inspired you to create
some beautiful!

Betsy

In my capacity as a design team member for Brutus Monroe, I do receive the products I use from them. 

All opinions and creative decisions remain my own, and I only work with companies/use products that I love.


Tuesday, October 11, 2022

Give Thanks Eat Pie with Brutus Monroe


Hello everyone!  I hope everyone is doing well and creating fall crafty projects!
My project for you today features products from


This card was fun to put together.  I had something completely different in mind
when I started!  Let me show you how I made this card!
I first took a piece of Strathmore 5" x 7" hot press watercolor paper and taped it
to my hardboard.  Starting in the middle of the panel I brushed on Yellow Aqua
Pigments, then Yellow Orange on either side and then finally some Brown on
the ends.


To get this nice gradation of color I didn't wet my paper first.  I simply took a
flat paintbrush and worked the pigments back and forth across my panel.  I
left it to dry naturally.  I had no warping.  Next I heat embossed my images,
twice, using Golden Gourd Embossing Powder.  I use this as a gold for all
my fall cards.  Its gorgeous!


I die cut the sentiment and the extra pecans with a 1 1/2" stitched
hexagon die.  I painted all of my images with the Aqua Pigments.
I mostly used the Yellow Orange and Brown.  I made a mini slimline
card base from some mustard card stock.  I cut a panel of plaid
paper from the Playful Plaid Collection and cut it 1/4" smaller
than the base.  I backed the plaid piece with some rich red card
stock and adhered that between the base and plaid paper.


I splattered my painted panel with a rich gold watercolor and then trimmed it to 
2 1/4" x 5 1/2" and adhered it to the card.  I fussy cut my pie slices and pecans. I 
foam taped the sentiment to the middle of the card.  I foam taped the pie slices on 
either side of the sentiment.  Then I used 3 of the pecans and adhered them flat.
I used gold holo confetti and a bit of Fallen Snow Glitter Glaze on the pecans.
And that finished my card!


This card took some twists and turns but I love how it came out!  Easy
as pie! (LOL). You can find the products I used at


Thanks so much for stopping by today!

Betsy

In my capacity as a design team member for Brutus Monroe, I do receive the products I use from them. 

All opinions and creative decisions remain my own, and I only work with companies/use products that I love.


Best-Teas ft. Pajama Crafter Stamps

Hello everyone!  This time of year it's so nice to be cozy with a mug of tea and your bestie!  Today I'll be using products from Paj...