Hello everyone! Today I'm bringing you something extra fun
with cutting dies!
This die set is so cute! I've also used the Sea You Soon Stamp Set for
the sea floor and the sentiment and bubbles. Let me show you how I
made my card. I even came up with a new technique!!!
First I prepared my background by ink blending an A2 white heavyweight
card stock piece. I used Distress Ink in Cracked Pistachio, Peacock
Feathers and Chipped Sapphire.
I actually let this sit overnight. I also splattered it with water.
Next I stamped my sand castle and heat embossed it with
I used a light tan card stock for this that had small dots embossed on it.
After heat embossing, I fussy cut the image.
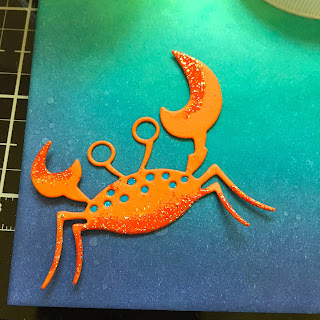
Next I moved on to my die cut fishes. I tackled the crab first. I
used a medium burnt orange to ice cut him. I cut a piece of white card
stock that fit behind his body. I heat embossed the top of this piece
with Mermaid Lagoon Embossing Powder. When glued to the back
of the crab, it gave him blue dots!
Now the new technique comes in. With an embossing pen, I did
Free-Style embossing! At first I used the pen on the inside of his
claws, his legs and underbelly. Later on I would go back in and
get the top of his body and around his eyes. I heat embossed these
areas with Rainbow Sparkle Embossing Powder. This quickly
becomes my favorite to use on this project!
Next I die cut the piece of coral in an aqua shad and using the
free-style method with the pen, heat embossed the ends of the
corals first with Gilded and then with Rainbow Sparkle Embossing
I moved on to the sea horse next. I cut the main piece from dark teal
card stock. I die cut the belly and back fin from glitter card stock. The
eye and markings on the belly were from black and the cheek was
Embossing Powders again. He came out so adorable!
Next I die cut the scallop shell. I cut the back piece from some warm
gold glitter paper and the front piece from the Pink Mermaid Skin Paper.
I did not add any embossing powder to this piece.
My last little fish was next. I die cut the main body from some bright
yellow card stock (yes, he did look like a pac man!!!!!). His fins were
cut from the same dark orange as the crab and his little stripes were the
same card stock as the sea horse. His little eye was black. I only used
the Rainbow Sparkle Embossing powder on him, but using the same
free-style technique allowed me to put the sparkle where I wanted it!
Now that all of my supporting characters were done, I moved on to
the card base again. From the stamp set I stamped and heat embossed
my sentiment using Night Shift Blue Embossing Powder. That is
extra gorgeous embossing powder!!!!! I also filled in the flag on
the sand castle with it. And I stamped the bubbles and used the Rainbow
Sparkle on those as well. After I adhered
the sand castle to the base of my panel I did some very light
shading with a Y28 Copic Marker. I also made 3 wave lines in the
water and heat embossed those with the Rainbow Sparkle.
I adhered my base panel to an A2 size top folding white card and
adhered my little creatures on. They are all adhered flat except the little
yellow fish who I popped up on Brutus Monroe Clear Foam Tape.
Once everything was on, I used a white gel pen and highlighted
all of my elements. And that finished my card!!!
I believe that everything under the sea sparkles! Working with these
cutting dies and enhancing them with embossing powder was so much fun!
The Plenty of Fish Cutting Die Set is a subscription product. That
subscription is only $15.00 a month. This set alone has well over
20 dies in it. It's such a great deal! Look under under
"Subscription Products" at:
Thanks so much for stopping by today. I hope I've enspired you
to create your own undersea adventure!
Betsy
In my capacity as a design team member for Brutus Monroe, I do receive the products I use from them.
All opinions and creative decisions remain my own, and I only work with companies/use products that I love.


No comments:
Post a Comment