


Hello everyone! Today I'm sharing this beautiful technique using products from ScraPerfect!Nothing sparkles like glitter or gilding flakes or both together!
They make a fabulous card technique!
CAUTION: this is a very messy technique!
Let's begin:
I started by cutting a piece of heavy black card stock to about 4 1/2" x 6". And I took
out my Best Glue Ever with the No-Clog Writing Cap.

I squeezed a good amount of the Best Glue Ever out onto a piece of acetate - packaging that I
was just going to throw away. I took an older paintbrush that I didn't want and got
it wet and blotted it slightly onto a paper towel. This provides a bit of water to add to the
glue to make it move better. Then with sideways strokes I "painted" my piece of
card stock with glue and then let it dry.

My paper buckled vertically, but as it dried it laid flat. I selected a stencil that I
thought would work well with this technique and laid it over the dried piece of
card stock. No need to spray or tape down my stencil. The dried Best Glue Ever
remains very tacky when dry so it held down the stencil perfectly.

First, I applied my gilding flakes. I sprinkled them on all over. The panel does not
need to be absolutely covered.

Next I started brushing the flakes with an old stencil brush. I continually brushed the flakes
making sure I was brushing them into all of the open areas of the stencil.

This tends to be a bit messy as those flakes love to fly around! When all of the exposed
areas are covered, lift off the stencil. It should look like this.

Remember - anywhere there is black, it's sticky. I loved this look of the black against
the gold. I didn't have any fine back glitter. Fine or superfine glitter works the best for this.
So, I decided to go with another color that was in the flakes - teal. I poured the teal
glitter - which was a very fine glitter - all over the panel.

It was at this point, I knew I was going to need help reining in all the loose glitter! It was
not a problem with the Perfect Cleaning Cloth. From this point on in my project, this
was right beside me! Before tapping off the glitter, I burnished it with my finger by firmly
rubbing it all over. Then I took a another piece of scrap acetate, laid it
over the panel and burnished it with the side of my teflon bone folder. I needed
everything adhered as firmly and flat as possible.

As pretty as this was, I really liked it before I put the glitter on - I liked the black
against the gold. So I made another one, cut my black panel a bit bigger this time so I would
have a place to hold on to and used the coarser black glitter that I had. This
was where I realized that superfine glitter is a must. It looked ok, but I really
think the finer glitter would have been better.

At this point, I was really glad I had that Perfect Cleaning Cloth...because black glitter 😱!
Finally it was time to make my cards! I remembered I had a piece of 12" x 12"
paper that I had literally been saving for at least 3 years. Sometimes it's so hard
to use that pretty paper!!!! LOL! But, I knew that it would look so good against
the gilding flakes and the teal glitter. I felt the design of the stencil I was using lent
itself to being cut apart...which I did and actually made 2 cards using the one piece.
I followed the lines in the stencil to cut 2 pieces.

I cut my paper into 4 6" x 6" panels. I chose one side for one card and the
other side for my other card. I used die cut sentiments on each. On one I used a flower
embellishment, which is adhered really well with the Best Glue Ever with the
No-Clog Writing Cap and just a few gems on the other card.


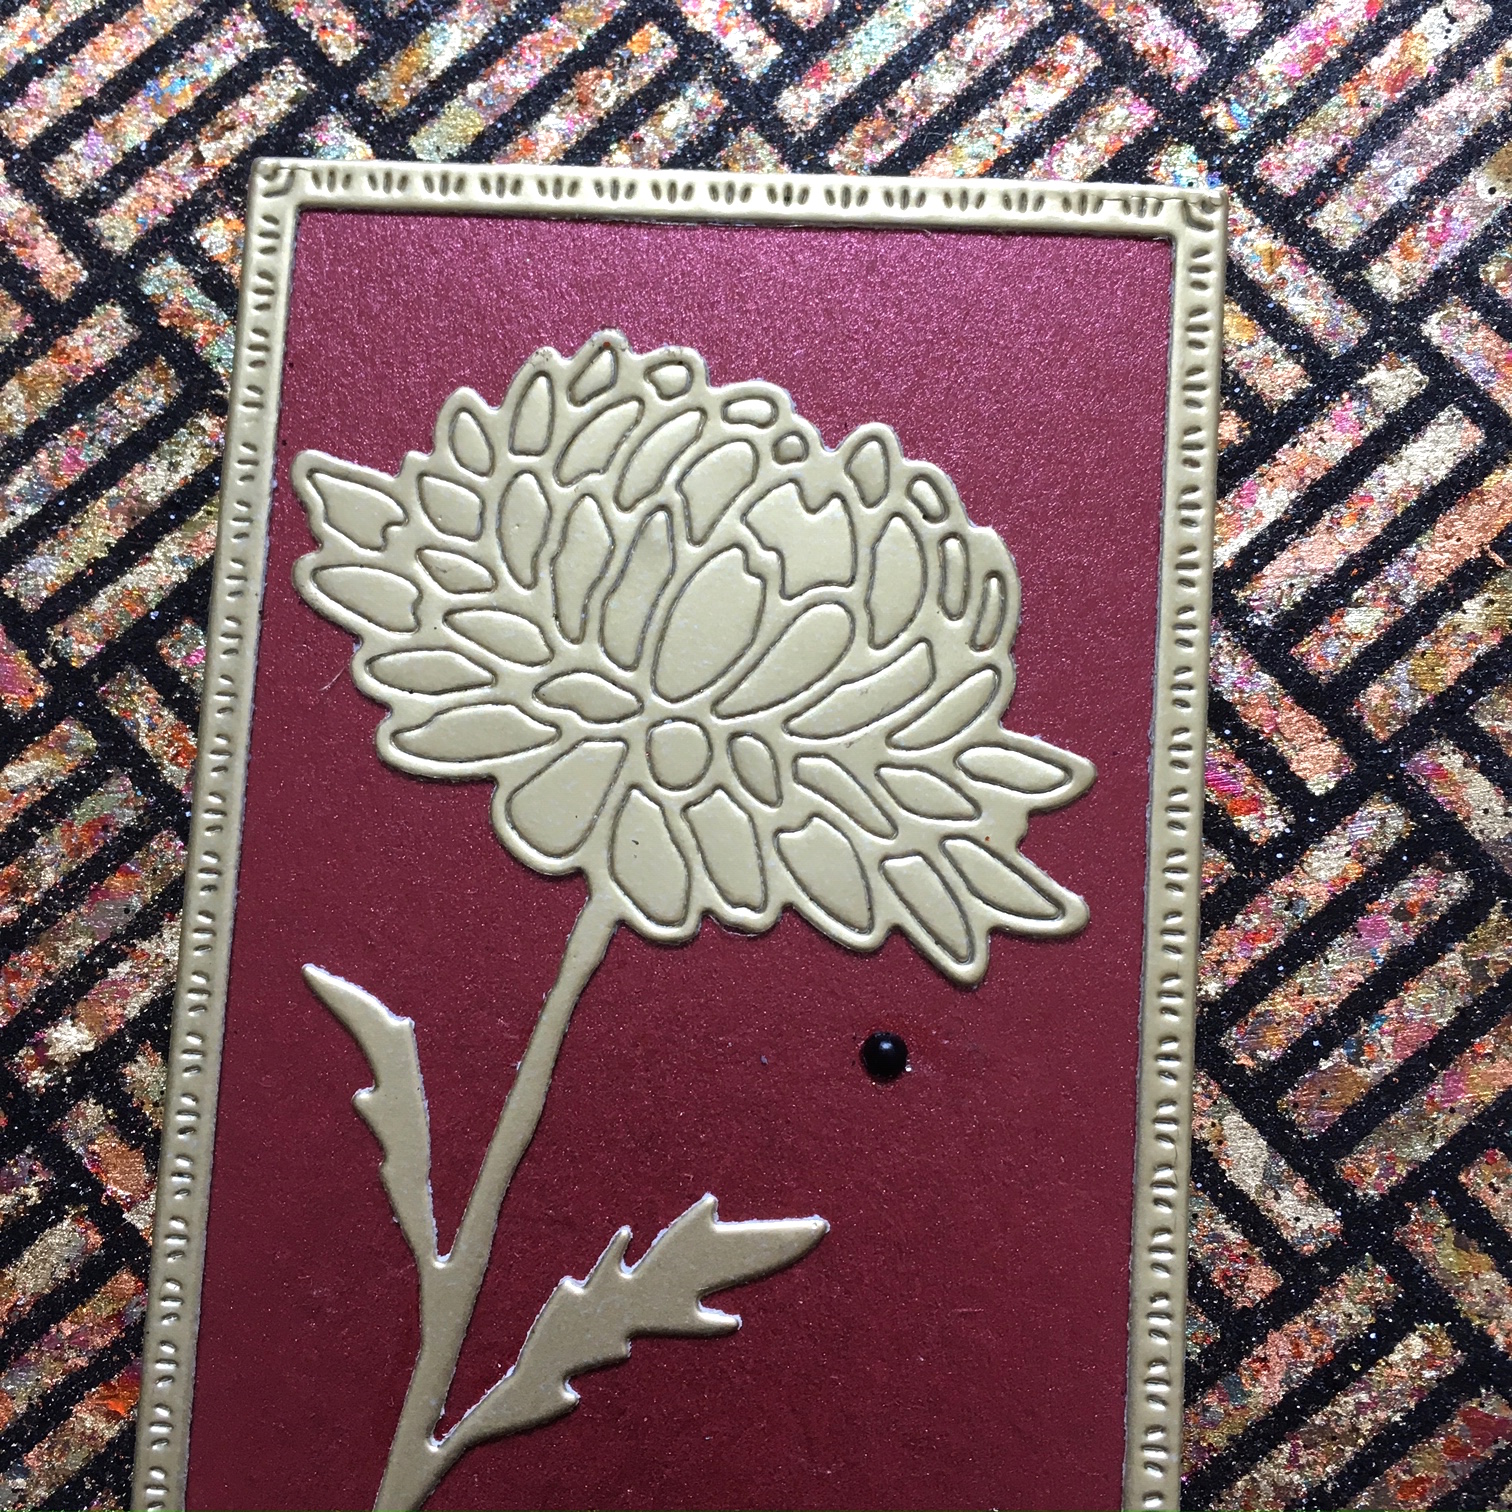
For the final card, I felt that panel could stand on its own with a nice focal. I cut it
to 3 3/4" x 5", edged it with gold peel-offs, and created a focal with a die and gold
card stock with the die cut pieces left in and a panel of red pearlized card stock to
back it. I then added a few tiny black pearls.
This project was so fun to make and there are so many variations to be had. I hope
you give this project a try! Please tag us on social media if you do...we would love
to see your projects that we have inspired you to make!
ScraPerfect Products Used in this Tutorial:


Other Products Used:
Fabriano Ultra Black Drawing Paper
Altenew Stencil: Square Weave Pattern
Graphic 45: Masquerade
Cosmic Shimmer Gilding Flakes: Autumn Leaves
Gina K Designs Sea Glass & Tomato Soup Card Stock
Black & Teal Glitter
Gemstones
Flower Spray
Thank You Dies
Dahlia Die
Red Pearlized Cardstock
Love From Lizi: Gold Peel-offs
Gold Card Stock
Tiny Black Pearls
Thank you so much for stopping by! I appreciate all of
your follows and support!
Betsy
In my capacity as a
design team member for SraPerfect, I do receive the products I use from them.
All opinions and creative decisions remain my own, and I only work with
companies/use products that I love.


No comments:
Post a Comment