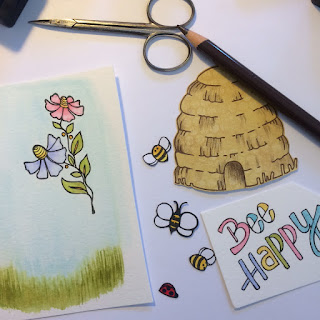
Today I will be showing you how to make this adorable Bee Happy shaker card using stamps and papers from ADORNit! Could this bee any sweeter? 🐝
Supplies I used:
- A6 White card base
- ADORNit Stamps: Bee Happy Clear Stamp, Sunshine Clear Stamp
- Papers: ADORNit "Bumble" Collection
- Sheet of acetate
- Scrap of gray/silver paper
- Scrap of plain white yardstick
- Sequin mix
- Versafine Onyx Black pigment ink
- Gina K Designs Dark Chocolate Ink
- Waterbrush
- Distress Inks: Peeled Paint, Broken China, Mustard Seed, Shaded Lilac, Warn Lipstick, Twisted Citron, Wild Honey, Candied Apple
- Tiny Bee stamps from Honey Bee Stamps
- Foam Tape
- Paper trimmer/cutter
- Scissors for fussycutting
- 5 x 7 piece of watercolor paper
- Wink of Stella
- White and Dk. Brown colored pencil
- White gel pen
- Glue
- Tape Runner
I started by cutting the Wordplay sheet of paper from ADORNit's Bumble Collection. I cut this 1/8 inch smaller than the card base. Then I stamped the jar from the "Sunshine" stamp set in Versafine Onyx black ink and an assortment of bees and ladybugs on a piece of white cardstock. I also stamped the hive from the Bee Happy stamp set on the Posy paper. I then fussycut the hive leaving a very narrow edge on it. I also cut half of the hive opening - the left side - so later I could insert a little bee. I also cut out the inside of the jar image leaving about 1/4" along the inner side. The watercolor paper was trimmed down to 5.75 x 3.5 in. On the scrap that was left I stamped the "Bee Happy" sentiment and the flower (which I didn't end up using).
On the watercolor paper I made pencil marks (which I erased when the painting was dry)so I knew there to put my paint. I also stamped the flower image directly onto the paper (I really didn't want to fussy cut it) using the cutout hive to determine placement. Using Distress Ink as paint, I smooshed the ink onto an acrylic block and used my water brush. I painted the sky with Broken China and the grass with Peeled Paint. I kept this very light and loose. I avoided painting over the flower and when the sky and grass area were dry, then moved onto the flower and the other elements that needed color.
On the bees I used Mustard Seed, then Wild Honey to deepen the color. The lady bug is Candied Apple with the dots filled in with a black marker. The flowers were Shaded Lilac and Worn Lipstick.
I went over the flowers a second time to add a little shadow near the centers. The centers were Mustard Seed shaded with Wild Honey down the left side. The leaves were Peeled Paint with Wild Honey veins and when that was dry I went over the leaves again with Twisted Citron. The little dots were done with Wild Honey. The sentiment was painted with a mix of all of these colors. When these were dry I fussy cut 2 big bees, 2 small bees, the sentiment and I also stamped the jar lid on a piece of gray scrap paper and cut that out. The sentiment was cut out leaving the 2 words attached to one another and not cut right to the edge. All of the other elements were cut right to the edge and I ran a black marker around all of these edges to finish. I didn't use the marker on the sentiment. I also added extra shading on the hive with the dark brown colored pencil.
Assembling was next. First I glued on the hive making sure to avoid the left side of the opening so I could slip a little bee inside. Then I glued on the bees and the lady bug. After this was dry I used my tape runner along the sides and adhered one piece of acetate flush over it. I fussy cut the jar lid and glued it to the top of the stamped jar image. Another piece of acetate was adhered to the back of the front piece with the jar opening. Once I had that done I could place the sentiment by laying the front piece on top of the watercolored piece. I adhered that on and another bee on the other side. It was only after I adhered this bee that I used Wink of Stella on the wings. Next came the shaker assemblage. On the reverse side of the front I placed foam tape (lots of foam tape!) and on the watercolored piece I made a little pile (ok it was fairly big - I did go a little overboard and later had to take some out! I would have been better off using a double row of foam tape) of sequins.
I peel off the release paper from the foam tape and gently laid this on top of the watercolored piece. It won't stick completely to the foam tape until you press down on it. Once that was together I highlighted the top of the jar with white colored pencil and added tiny hi-lites over top of that with a white gel pen. I then adhered the entire panel to my card base and that was it!
How sweet and sparkly this is! I'm sure someone would "bee" so pleased to receive this in their mailbox! 🐝
Thanks for stopping by,
Happy paper crafting and remember.....it's just paper!
Betsy


No comments:
Post a Comment