Tuesday, June 10, 2025

In Full Bloom ft. Pajama Crafter Stamps


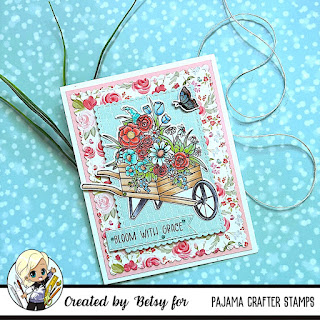
Hello everyone!  Today I'm sharing this sweet floral card using
products from


This stamp set makes such a sweet card.  Most of the sentiments are
spring related, but with another sentiment it works for every occasion!
Let me show you how I made my card.
I first stamped and die cut my images onto white card stock.  I die cut
the images first so I wouldn't have to start over if I messed up - LOL!
I also picked out my papers for my card base.  I used a white speckled card
stock for my A2 size card base, then a panel of pink card stock, then a panel of
flowered card stock that was die cut using a need scalloped rectangle 
die and then finally an aqua panel die cut with another of the same set
of scalloped rectangle dies.


I also stamped and die cut a banner.  Next it was time
to color up the images.  I decided I wasn't going to use the
watering can so I saved it for another project.


I put a layer of the lightest color onto the parts of the image.  This
serves as sort of a map to make sure I didn't color something in error.


I was quite pleased with how the coloring turned out.  I wanted it to
stand out from the background, but not totally overtake it.  It didn't
take long to color and I kept the bend fairly easy.  I used the colors
in the floral paper as my guide to color choices.
Copic colors used:  E30, E34, YR31, B41, B32, B34, BG11, BG13,
G12, YG03, R20, R24, R14, C2, C7, C5, C3


I adhered my aqua panel with thin foam tape.  I added the sentiment in the
lower left corner trimming off the straight end to fit.  I added the butterfly
with foam tape.  I used a shimmer pen on the flower center and the butterfly.
I did a bit of black pen work on the butterfly and then wherever I had used
the shimmer pen I used Glossy Accents.  Then I sprinkled some tiny
gems around the image for a bit of sparkle.  And that finished my card!


I hope you enjoyed today's tutorial.  Such a sweet card with images
that could be used for so may things!  You can find the products that
I used on my card and so much more at


Til next time...

Betsy

In my capacity as a design team member for Pajama Crafter Stamps, I do receive the products I use from them. 

All opinions and creative decisions remain my own, and I only work with companies/use products that I love.


Wednesday, June 4, 2025

Catnaps - Honeypie ft. Polkadoodles


Hello everyone!  Hope your spring is going well.  It's still kind of cold and
rainy where I live...😞. Today I'm sharing a project made with products from


I made an easel card today to show off Honeypie and her kitty.  It's not difficult
to make, so let me show you how I made my card!
I first composed and printed out my images onto white card stock.


Everything was separate.  I didn't do any layering.  I die cut my plaid
paper with a scalloped rectangle die.  I made a white A2 size top folding
card base and scored the front of it in half.  I cut my die cut plaid panel in half
and adhered one on either side of the fold on the front.


I also cut out my sentiment and backed it with a piece of the left over
plaid.  Next it was time to color my focal - Honeypie and her kitty!


Coloring is probably my most favorite part of card making!  And I
aways start with the face first.


The hair came next.  Often times I'll Google image "hair Copic
markers" for inspiration like I did here.  That gives me a 
jumping off point for the hair coloring.  And usually there is
a list of markers that were used.


I wanted to keep her clothing and hair scrunchies the same colors
as the plaid paper.  To give a little more interest to the scrunchies I
made a pattern with my markers.


I didn't go too wild with the coloring and it worked up quickly.  After
that, I fussy cut the image.


I printed out another sentiment and die cut it for the front of the
card.  To put this together I adhered the longer unmatted sentiment
to the front of the card with foam tape.  I die cut a small lavender
bow and adhered it above that sentiment.  I adhered Honeypie to just the 
front of my card, so that when it was popped up, you would see
her whole image.  I adhered the other sentiment that I had backed
with the plaid paper, inside the card with foam tape to act as a
stopper when the card was put upright.  I added a bit of shimmer with
a silver sparkle pen and added a few dots with a white gel pen.  Then I 
sprinkled a few tiny gems around Honeypie and one right in the
middle of the flower in her mug.  And that finished my card!


I hope you enjoyed today's tutorial.  So easy to make such a cute reminder
of how much you love and appreciate a close friend!  Supplies are listed below.  You can find 
this digital stamp set and many more at


Supplies
Catnaps - Honeypie digital stamp
Just Lovely - Honeypie digital paper
Just Lovely - Sentiments
Card Base
Tiny Gems
Silver Sparkle Pen
White Gel pen
Banner Die
Foam Tape
Bow Die
Scalloped Rectangle die 
Copic Colors:
E00, E01, BV000, B02, RV10, Y20,
BV000, YR20, YR31, E23, E35, E37,
E33, YR24, RV52, RV13, C1, C5, C3
C2, E57

Til next time,

Betsy

In my capacity as a design team member for Polkadoodles, I do receive the products I use from them.

 All opinions and creative decisions remain my own, and I only work with companies/use products that I love.


Tuesday, June 3, 2025

Sweet Friends ft. Pajama Crafter Stamps


Hello everyone!  Summer is in full swing!  Hope you are having fun
and enjoying some nice warm summer weather!  Today I'm sharing this cute 
card using products from


This little cat from the High Five Set is so sweet!  And she's playing with
her little bird friends!  Let me show you how I made my card.  I chose my
background paper first from the Spring Plaids paper pad and die cut a panel 
using a stitched scallop rectangle die from my stash and then die cut an oval 
out of white card stock using a stitched nesting oval die.  I stamped out my 
cat image and the 3 little birds onto white card stock. 


I die cut my cat before I colored her.  This cat is only about 2" tall,
and the birds are about 1/2" around, so the coloring was quick.


I colored up the 3 little birds and then fussy cut them.  I stamped the
sentiment onto another smaller oval die cut out of the aqua card stock
that I cut to fit the background of the card which was 1/8" smaller.


I adhered the aqua card stock to the black white card base.  I did round
the corners first.  Then I adhered the plaid piece which was die cut with a
scalloped rectangle die and wrapped around the middle with some 
pale pink and white twine and popped it up on foam tape.  I also used the
foam tape to adhered the cat, birds and sentiment.  I finished with a few
pieces of confetti and some tiny black dots around the birds.  That
finished my card!


This is such a sweet card...the cat is my favorite!  I hope I've inspired
you to make one for yourself to give to someone!  You can find these
products that I've used and many more at


Copic markers used:
E30, E31, E34, W1, W3, R81, R83, R000, Y00, Y21, YR21,
BG10, BG11, C007 (Altenew), YR12

Til next time...

Betsy

In my capacity as a design team member for Pajama Crafter Stamps, I do receive the products I use from them. 

All opinions and creative decisions remain my own, and I only work with companies/use products that I love.


Serenity Stardust ft Polkadoodles