Wednesday, May 21, 2025

Wanda & Her Soda ft. Polkadoodles


Hello everyone!  Hope you are all doing well and enjoying spring
as it makes it way to warmer days.  I'm sharing a fun project with you
today featuring products from


This made such a cute scene featuring Wanda!  I really wanted Wanda
to pop and not get lost in the scenery.  So I amped up the brightness of
the colors on Wanda and kept the background fairly light.  Let me show
you how I made my card.


I composed my card in the computer and placed Wanda and the
sentiment on as well.  I printed it out onto white card stock and then
I die cut it using a rectangle die from my stash.  I started by coloring
the sky and the water.


I laid in more light colors to the background and then I focused on
Wanda.  I imagined Wanda as a sassy redhead and went from there.


I did draw a pencil line between the park scene and the sentiment.  I
knew I would be covering up the line and it gave me a good guideline
as to how far down my coloring needed to go.  I finished up the coloring
and kept going until I felt it was done.  I placed a black peel-off between
the sentiment and the scene.  I added Stickles to Wanda's Drink, the
flower in her hair and the flower on the right.  I also added some random
dots in the water and grasses and a few around the sentiment.  Using
a scalloped rectangle die, I die cut my background paper and adhered it
to my white card base, then added the main panel.  I added Glossy Accents
to her shoes and that completed my card!


I hope you enjoyed today's tutorial.  It was an easy card to make and
it's so cute!  You can find the digital products I used for my project at


Supplies used:
Wanda Soda Pop Shake Digital Stamp
Wanda Messages Digital Stamp
Park Scene Digital Stamp
Copic colors used:  
BG10, BG11, W2, W3, G20, G12, C7, 100,
E30, E21, E01, B0000, Y11, Y21, Y15,
YR18, YR21, YR12, YR14, G21, E53, W1,
C5, C7, E93, RV10, BG13, RV21, RV13
White card stock
Coordinating background paper
Scalloped Rectangle Die
Stickles
Glossy Accents
Black Peel-off
White Card Base

Til next time,

Betsy

In my capacity as a design team member for Polkadoodles, I do receive the products I use from them. 

All opinions and creative decisions remain my own, and I only work with companies/use products that I love.


Monday, May 19, 2025

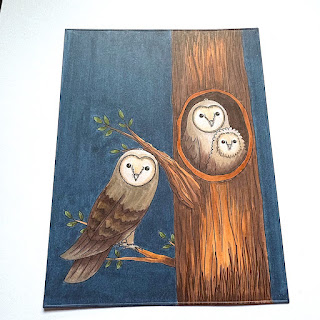
Animal Pals - Owls ft. Kate Hadfield Designs


 Hello everyone!  Today I'm sharing a cute baby card using unexpected

digital stamps!  I'll be using products from


Kate Hadfield Designs

Animal Pals - Owls


I love owls and live in an area where in the summer and fall I can hear 

the owls hooting to each other when they wake up in the afternoon!   It’s always a treat to hear them!  Let me show you how I made my card.

I first composed my images in the computer and printed them out onto white card stock.


I think it was at this point that I decided I could use this for a new baby card!...plus I have a friend who calls her baby girl an owlet!   I knew this was not going to be complicated to color so 
I started in with the sky background.


I went over these areas of sky more than once so the color would be saturated and very dark.


Once I finished the sky, moved onto the rest of the coloring using browns and warm grays.


Once the coloring was done, I used a rectangle die from my stash to die cut the panel.  I had to

Do some extending…as my coloring did not extend to the height of the die cut panel.  Once I had done that, I die cut a circle for the moon, computer journaled the sentiment and colored the card stock it was printed on and foam taped it to the panel.  I added tiny metal stars and 

Star Dust Stickles to the moon which I adhered with foam tape.  I adhered the whole panel  to an A2 size card base in a soft gray and my card was done!


I hope you enjoyed today's tutorial.  I think it's perfect for a new

baby welcome!


Supplies used:

Animal Pals - Owls

Copic Markers: B99, W0, W1, W3, W5, W76, W7, G94, G99, E33, E35, E37, E43, 

E47, E55, E49, E71, E 77, E79, Y000, Y11, Y21

Rectangle Die

Small Circle Die

Sentiment – scrap of white card stock

Tiny Star embellishments

Star Dust Stickles

Foam Tape

Warm Gray card base


You can find the products I've used in my project today at


Kate Hadfield Designs


Til next time…


Betsy


Tuesday, May 13, 2025

No Talkie Before Coffee ft. Pajama Crafter Stamps


Hello everyone!  I don't know about you, but this pretty much sums up me in the morning!  
Today I'm sharing a very cute coffee card made with products from


This project definitely had it's ups and downs, but I think the end result is so adorable!
Let me show you how I made my card!


The first thing I did was to foil my flashcard. I used a bronze colored foil. Then I chose my background papers and made my layers for the card. I started out with this plan but in the end I don't use it.


I color-matched my coffee mug to the plaid paper I had die cut. I stamped 2 of the paw prints onto the mug. I used a metallic ink but it jut wasn't showing off the metallic property of it. So, I took a brown gel pen - that was quite juicy - and colored in the 2 paw prints. That's when things started to go south. Somehow I got the gel pen ink on my left hand and smeared the coffee cup (you can see the smear on the bottom) and on the white part of the card base. I was able to get most of the gel pen off the mug but you could still see it. The card base with all the layers of card stock just couldn't be saved, so I made a new one. For the mug I stamped another paw print over the stain and very carefully went over it with the gel pen. It worked!


Then I made a new card base that I actually liked better than the first!


I added some Night Out Embellishments for the eyes. And then I used A Mermaid's Tale Confetti to dot the mug so it looked like it had a pattern. I re-did my background and left off one of the layers. I die cut the plaid paper and a white piece of card stock with scalloped nested rectangle dies. I made the white one 2 sizes smaller so more of the plaid paper would show and I wanted it smaller than the mug. I originally was going to have this card be a portrait orientation, but in the end decided I liked the landscape orientation better.  I popped the mug up with foam tape and that finished my card!

I hope you enjoyed today's tutorial. I feel with this card - you win some (the paw print on the mug to hide the stain) and you lose some (making a new card base). It is just paper and we shouldn't be afraid of making mistakes, fixing mistakes, or just chucking the whole thing into the trash! It's just paper!

Supplies used:

  • But First Coffee Flash Cards
  • Spring Plaids Paper Pad
  • High Five Stamp Set
  • Night Out Pearl Embellishments
  • A Mermaid's Tail Confetti
  • Copic markers:BG10, BG11, BG01, BG13, BG53, W1
  • Foam Tape
  • Scalloped Nesting Rectangle Dies
  • Brown Metallic Pen
  • Brown or Bronze foil
  • Coordinating card stock for card base
  • Low loft foam tape

Til next time...

Betsy

In my capacity as a design team member for Pajama Crafter Stamps, I do receive the products I use from them. All opinions and creative decisions remain my own, and I only work with companies/use products that I love.


Wednesday, May 7, 2025

The Painter ft. Polkadoodles


Hello everyone!  Spring is here and it's time to tackle all those household
projects - like painting!  Today I'll be using products from


Do you have a guy in your life who does everything?  Doesn't he deserve
card to let him know how special he is?  Let me show you how I made my
project.  I started by composing my image onto the digital paper in the
computer.  I also used a patterned piece of digital paper so I could paper
 piece the wallpaper.


I changed the color of the background paper to tan in the computer.  That small
strip on the bottom is the patterned paper for the wallpaper paper piecing.
To paper piece, I first print out the image in black and white onto copy
paper.


Then, using washi tape, I adhered the patterned paper to the area where
the wallpaper rolls were and sent it through my printer again.


I fussy cut the wallpaper rolls right up to the edges and then used a black
marker along the edges before adhering it to the card stock piece.


And it will fit perfectly over the uncolored wallpaper!


Next on to the coloring.  I kept things pretty simple and used the
wallpaper colors to determine my color palette.


I always like to color the face first.  It makes the rest of the coloring make
more sense somehow.  You'll notice that I extended his mouth a bit to make
it look like he's smiling...well, a half of a smile...LOL!


There's not a lot to color so this worked up quite quickly.  Even
before I finished the coloring I decided to die cut it using a die from
my stash.  Once the coloring was done, I splattered this panel
heavily using 3 dye ink colors that matched the wallpaper.  I also used a
small paintbrush and swiped ink on his clothing and face so it
looked like paint.  Once the coloring was done, I adhered the panel
onto some coordinating blue card stock and then used Glossy
Accents on the paint - the paint on the brush cans, and some on
him as well.  Once that was dry my card was finished!


I hope you enjoyed today tutorial!  You can find the products I used today
and many more at


Supplies used:
Painter, Decorator, Decorating Digital Stamp
Let's Hang Out Papers 1
Rectangle Die
Color card base
Glossy Accents
Black Marker
3 Coordinating dye ink colors
Copic: E0000, E00, E02, R00, R02, R20, YR00,
E30, E31, E33, E35, E37, E15, YG11, YG23,
YG03, YG25, YG67, C0, C1, C2, Y21,
BV0000, 100
Altenew Markers: C007, C005, B526

Til next time...

Betsy

In my capacity as a design team member for Polkadoodles, I do receive the products I use from them. 

All opinions and creative decisions remain my own, and I only work with companies/use products that I love.


Tuesday, May 6, 2025

Hats Off ft. Pajama Crafter Stamps


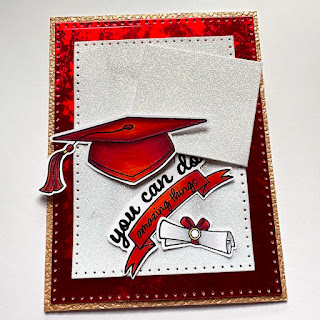
Hello everyone!  Graduation is right around the corner!  Do you have someone
in your life that's graduating?  Today I'll be using products from


I love making cards for special occasions and this was fun and relatively
easy!  Let me show you how I made my card.
I first stamped out the images I wanted to use onto white card stock.  I
used black pigment ink and heat embossed it with clear embossing powder.


Although embossing powder is not good for your Copic markers over time, I
was quite careful in my coloring to not go over the embossed part.  Next I die
cut my background pieces.


I die cut a panel of very textured gold card stock as the very back piece.
I used a mottled red mirri-board as my next layer using a die.  Using a
smaller die from the same set, I die cut a panel out of white glitter paper.
Next was the coloring.


Obviously my theme was red and white.  Except for 2 gray markers, I only
used red to color with.


I love how rich I was able to get the red.  Sometimes when elements I'm
coloring don't look good, I try to keep going because by adding more color
the blending is deepened.  Not much coloring on the diploma and sentiment.


After the coloring was done, I fussy cut my images leaving a narrow
white margin around the pieces.  Next, I die cut the gift card holder out
of white glitter paper.  I cut the top extended part off.  I used multiple
pairs of reverse tweezers to hold it the back bits together.


Once that glue was dry, all of my pieces were ready to assemble.


I adhered the gift card holder first.  I did use 4 pairs of reverse tweezer to
hold it in place - glitter paper is very stubborn!  I adhered this at an angle and 
that made my card a little more interesting.  I foam taped (with liquid glue
dabbed on each piece) and adhered the rest of the elements.  I used a gold
 metallic pen and used it for the medallion on the diploma and and the tiny metal
part on the tassel.  I embellished with some bright red gems and my card was finished!


I hope you enjoyed today's tutorial.  It's one of those cards that you
could customize so easily with school colors!  You can find the
products that I used and many more at


Supplies used:
Copic colors:  C1, 3, R02, R05, R14, R27, R37, R59
Several specialty papers
White glitter paper
Foam Tape & Liquid glue
Red gems

Til next time...

Betsy

In my capacity as a design team member for Pajama Crafter Stamps, I do receive the products I use from them.

 All opinions and creative decisions remain my own, and I only work with companies/use products that I love.


Serenity Stardust ft Polkadoodles