Showing posts with label paper piecing. Show all posts

Wednesday, May 7, 2025

The Painter ft. Polkadoodles


Hello everyone!  Spring is here and it's time to tackle all those household
projects - like painting!  Today I'll be using products from


Do you have a guy in your life who does everything?  Doesn't he deserve
card to let him know how special he is?  Let me show you how I made my
project.  I started by composing my image onto the digital paper in the
computer.  I also used a patterned piece of digital paper so I could paper
 piece the wallpaper.


I changed the color of the background paper to tan in the computer.  That small
strip on the bottom is the patterned paper for the wallpaper paper piecing.
To paper piece, I first print out the image in black and white onto copy
paper.


Then, using washi tape, I adhered the patterned paper to the area where
the wallpaper rolls were and sent it through my printer again.


I fussy cut the wallpaper rolls right up to the edges and then used a black
marker along the edges before adhering it to the card stock piece.


And it will fit perfectly over the uncolored wallpaper!


Next on to the coloring.  I kept things pretty simple and used the
wallpaper colors to determine my color palette.


I always like to color the face first.  It makes the rest of the coloring make
more sense somehow.  You'll notice that I extended his mouth a bit to make
it look like he's smiling...well, a half of a smile...LOL!


There's not a lot to color so this worked up quite quickly.  Even
before I finished the coloring I decided to die cut it using a die from
my stash.  Once the coloring was done, I splattered this panel
heavily using 3 dye ink colors that matched the wallpaper.  I also used a
small paintbrush and swiped ink on his clothing and face so it
looked like paint.  Once the coloring was done, I adhered the panel
onto some coordinating blue card stock and then used Glossy
Accents on the paint - the paint on the brush cans, and some on
him as well.  Once that was dry my card was finished!


I hope you enjoyed today tutorial!  You can find the products I used today
and many more at


Supplies used:
Painter, Decorator, Decorating Digital Stamp
Let's Hang Out Papers 1
Rectangle Die
Color card base
Glossy Accents
Black Marker
3 Coordinating dye ink colors
Copic: E0000, E00, E02, R00, R02, R20, YR00,
E30, E31, E33, E35, E37, E15, YG11, YG23,
YG03, YG25, YG67, C0, C1, C2, Y21,
BV0000, 100
Altenew Markers: C007, C005, B526

Til next time...

Betsy

In my capacity as a design team member for Polkadoodles, I do receive the products I use from them. 

All opinions and creative decisions remain my own, and I only work with companies/use products that I love.


Wednesday, April 9, 2025

Paper Piecing ft. Polkadoodles


Hello everyone!  Flowers are the epitome of Spring!  So
today I'm bringing you a card using products from


I love paper piecing - especially with flower images.  There
are many others to choose from this collection as well!  Let
me show you how I made my card.
I started by printing out my white card stock which would be
my focal piece.  Then, I printed it out onto copy paper and then
printed it out 2 more times by taping patterned paper over the
design.


I also computer journaled the sentiment onto the light pink paper.

Time to start the coloring.  I used my Copic markers for this project
and felt that it would be best to do the coloring first.  I started
with the green leaves, buds and stems.


I started lightly and then went darker.


I wanted my coloring to be a bit dramatic so I kept going darker
and darker with the greens.
Next I fussy cut each of the flowers on the pink papers.  I started
with the light pink first.  


I also went around the edges with a black marker.


I went around the design and finished cutting out the flowers using
the dark or light pink.  I adhered these to the white panel when they
had all been cut out and edged with the black marker.
At this point I decided to add a touch of shading coming out of the
center of each flower.  I then die cut the panel to give a more fancy
edge.  Once the panel was die cut and I adhered a piece of green
card stock to my white card base, I used a metallic gold pen and
filled in the stamen bits in each flower.

I then die cut my sentiment and trimmed off the edges to fit where I
wanted it to go.


As a final embellishment I adhered some tiny gemstones around the
flower cluster and that finished my card!


I hope you enjoyed todays tutorial.  I love paper piecing and actually
this was how I made my very first card using digital stamps!  It
brings an interest that otherwise would be there!  You can find this
flower digital stamp as well as many others at


Supplies used:
Alcea Hollyhock Digital Stamp
White A2 size card base
White and green card stock
Fancy rectangle die
Gold metallic pen
Thin foam tape strip
Tiny Gemstones
Copic colors:  R81, R83, R85,
YG11, YG23, YG63, YG67, RV34

Til next time...

Betsy

In my capacity as a design team member for Polkadoodles, I do receive the products I use from them.
 All opinions and creative decisions remain my own, and I only work with companies/use products that I love.


Sunday, November 1, 2020

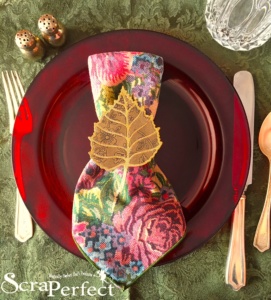
How to Make Seasonal Napkin Rings

llo everyone! Today I'll show you how to make seasonal

napkin rings using The Best Glue Ever!  They are so easy and can be made to match any decor!

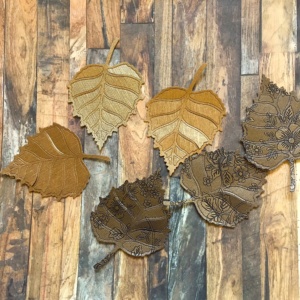
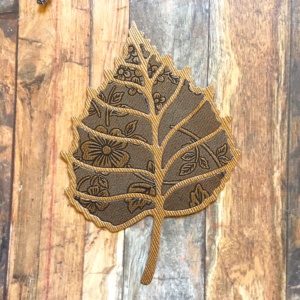
These were really quite simple to make and they look so pretty!  I started by

die cutting my leaves.

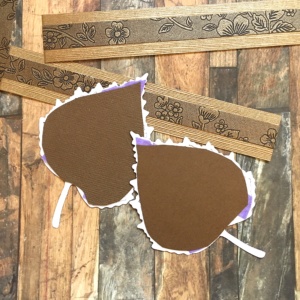
I used 2 types of specialty paper here.  And the insides of my leaves come out, so I

traded inside bits within the outline.  This gives a nice variation on the leaves!

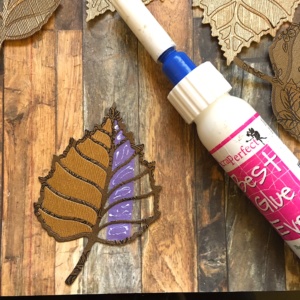
I used a piece of tape on the back of each leaf skeleton, but I also used the Best Glue Ever

as this would ensure my pieces would not fall out.

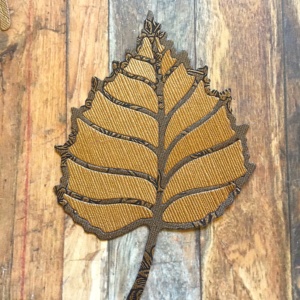
This was a 4" die so these leaves really make a statement!  To further stabilize the leaves

I backed them with a piece of dark brown card stock.

For the bands, I cut a 6" x 1" piece of the gold paper and a 6" x 1/2" piece of the

flowered paper.  I adhered the smaller strip on top of the wider strip using the

Best Glue Ever.

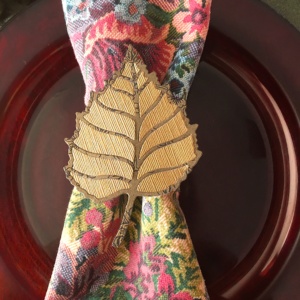
I glued each end of the strips together with the Best Glue Ever.  Then, I adhered the

leaves where the seam is and they are done!

I hope you enjoyed this project!  There are soooooo many possibilities to make your

table look festive and pretty!  And using the Best Glue Ever ensures that your project

stays firmly in place and able to use more than once!

Thanks so much for stopping by!

Betsy

Autumn Leaves ft. Kate Hadfield Designs