Showing posts with label Chroma Glaze. Show all posts

Tuesday, November 8, 2022

All Wrapped Up with Brutus Monroe


Hello everyone!  Hope everyone is doing well and staying healthy!  Today
I'm sharing a fun card made with products from


I have 2 nieces who just got engaged and I was thinking of them when I
made this card!  Let me show you how I did it!
I first did my stenciling on a piece of 6" x 6" white card stock.  I used a
finger dauber with the Pink Chroma Glaze.  By doing it that way, a 
thinner amount of  the glaze gets deposited on the paper.  


I did a couple of the bows as well but decided to do a few more on a
separate piece of card stock.  I put these off to the side to dry.  Next I
cut a piece of white card stock to 4" x 5 1/4".  I embossed that with an
embossing folder and then splattered it with gold watercolor.


When my stenciled panels were dry I cut each package so I would have
3 presents.  I added a bit of work with a black pen, just some dots, etc.
I trimmed out the bow with the ribbons and adhered them on top of the 
gift.  I foam mounted these onto squares of gold card stock that I cut just
1/8" bigger.


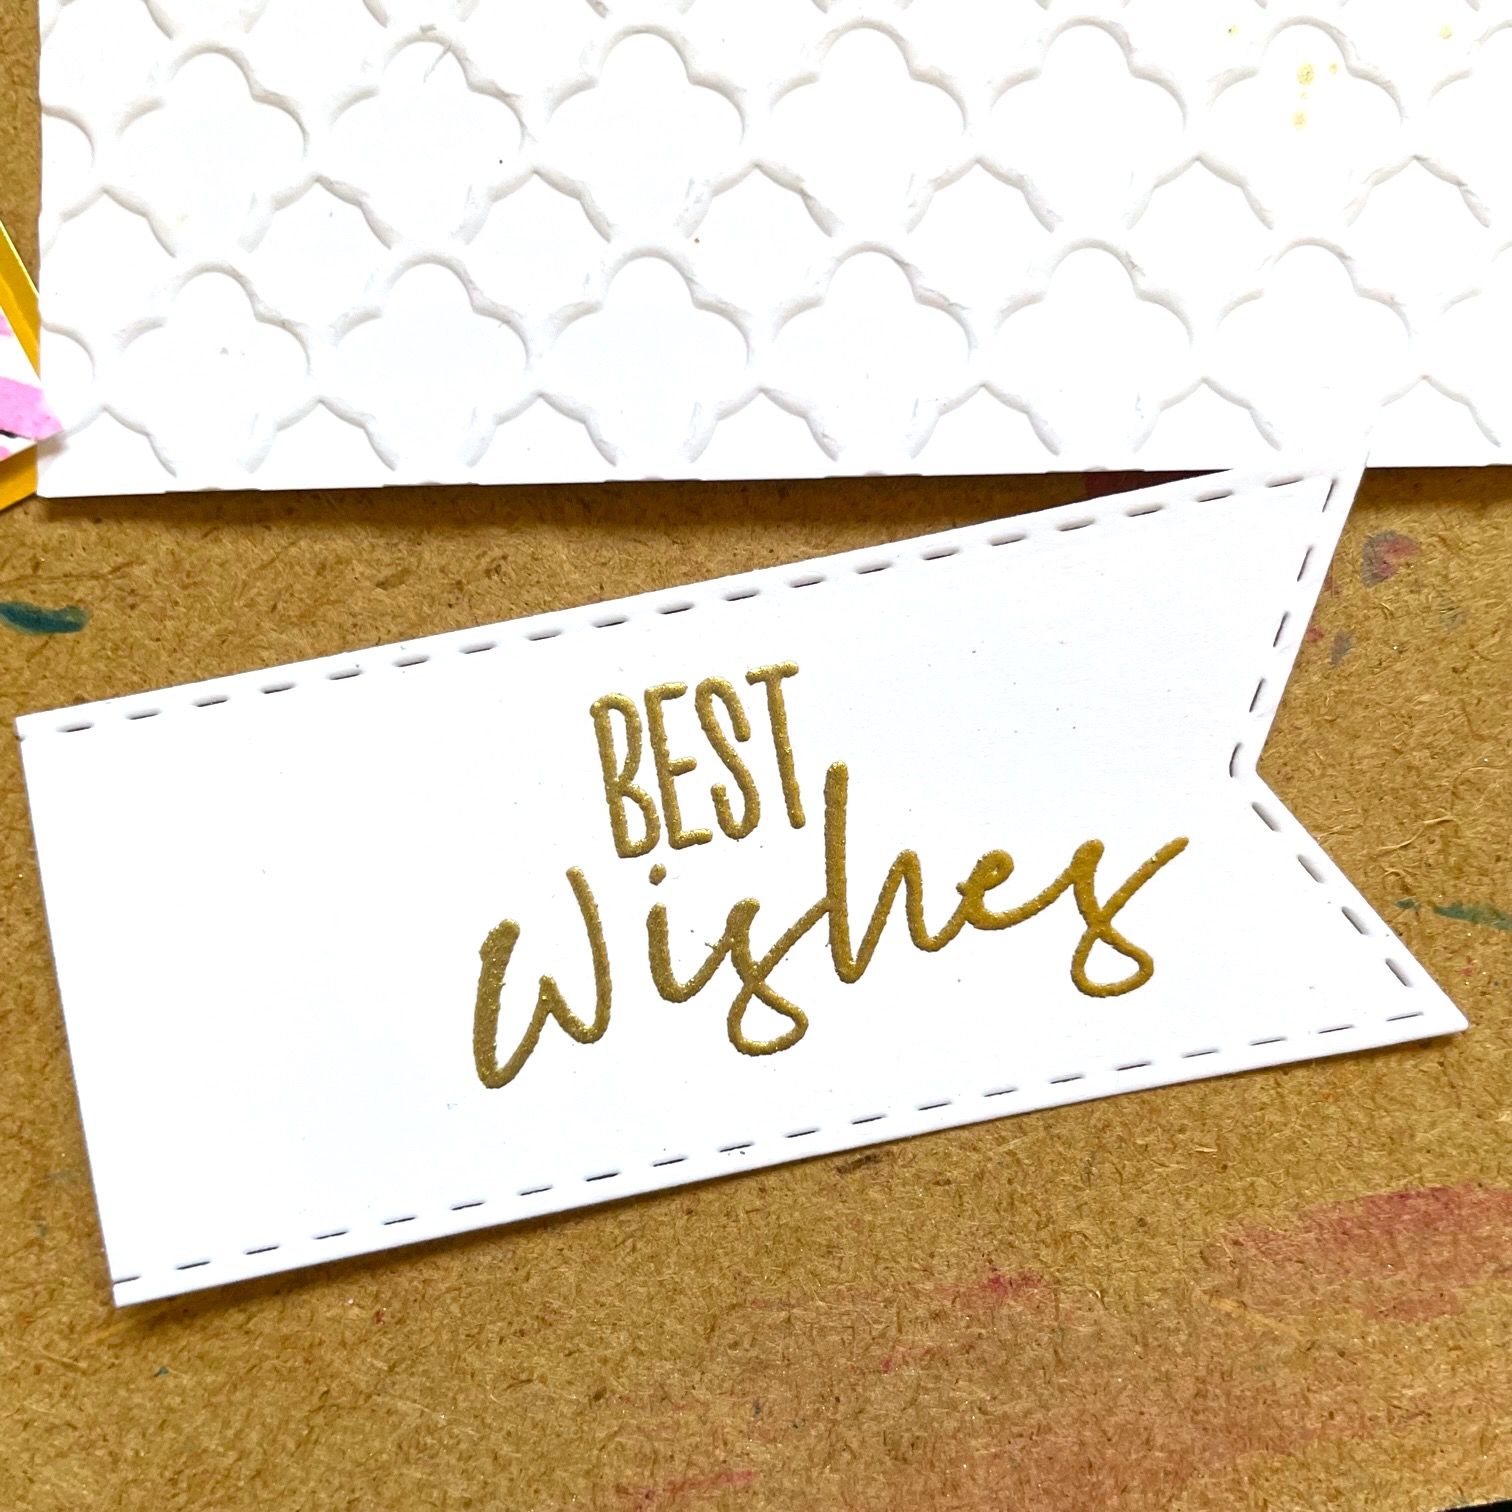
I stamped and heat embossed with Gilded Embossing powder a sentiment
from my stash.  Then I die cut it with a banner die.


I next took my embossed background panel and wrapped gold thread around
 the bottom of it.  Then I backed it with gold card stock and adhered it to
the card base.  I adhered my sentiment on at this time as well.


I adhered 2 of my gifts flat to the surface and then popped up the middle one
on foam tape where it didn't overlap the other two.  I added some gold
foil pearls and that finished my card!


This card was fun to make and I enjoyed working with all of the
textures.  You can find the products I used at


Thanks so much for stopping by!

Betsy

In my capacity as a design team member for Brutus Monroe, I do receive the products I use from them. 

All opinions and creative decisions remain my own, and I only work with companies/use products that I love.


Tuesday, October 18, 2022

Baked Fresh with Brutus Monroe


Hello everyone!  I don't know about you, but I love the smell of fresh baked
bread!  That warm yummy smell just hits the spot!  So today I'll be using
products from


I tried something a little different with this card.  I stenciled over an embossed
background!  It wasn't perfect but I like it!  Let me show you how I made it!
I first cut a panel of White Wash card stock to 4" x 5 1/4"and embossed it with an 
embossing folder from my stash.  Then I put it on my Stick and Stamp Mat
and used the Circles Stencil and Gold Chroma Glaze.  I didn't want full
coverage so I didn't put it all over my panel.  But what did happen was the
panel had raised edges from the embossing and in places it left almost a
double circle look.  I really liked the look it gave.


While I was waiting for that to dry, I stamped my elements for my card
from the Baked Fresh Stamp Set with some soft brown Copic-friendly ink.
I stamped my sentiment in dark brown pigment ink away from the other
elements so I could die cut it.


For the coloring of my elements I Google Imaged "Artisan Bread".  This
gave me the imagery that I needed for color.  I used various browns and tans and a
bit of desaturated yellow for the breads. 


 I also tried to give the bread some visual texture, so my coloring
was not straightforward.  I did some dotting and left areas without much
color.  I was fairly happy with how they looked.  I fussy cut these out and
die cut the sentiment with an oval die.


My stenciled panel was dry.  I made a card base using the same White Wash
card stock.  It's an A2 size top folding base.  I put foam behind my stenciled
panel and before laying it down I added some gold thread and wrapped it around
the lower part of the card.


You can see the thread is not straight.  I added this for a slight
grounding of the elements, but not representative of a surface like
a table top.  I adhered 2 of the breads flat to the surface but popped up
the one in the front on foam tape as well as the sentiment.  I added
some light chocolate pearls that really reflect the gold stenciling and thread .
As a last bit of detail, I added just a few white hi-lites with a white
Posca Pen and then with a fine black marker added black dots that
resemble poppy seeds.  And my card was done!


I really like how this card came out.  I love the gold Chroma Glaze with
the colors of the breads and I think they enhance each other.  The Baked
Fresh Stamp & Die Set are part of October's Inspiration Box.  You can
find the products I used at


Thanks so much for stopping by!  I hope I've inspired you to create
some beautiful!

Betsy

In my capacity as a design team member for Brutus Monroe, I do receive the products I use from them. 

All opinions and creative decisions remain my own, and I only work with companies/use products that I love.


Tuesday, September 6, 2022

Wood Stencil with Brutus Monroe


Hello everyone!  Time for autumn inspired cards!  YAY!  Today I'm using
products from


This was lots of fun to make and gave me a chance to use some alcohol ink!
Let me show you how I made my card.
I first cut a 5 1/2" x 5 1/2" square of Lunch Bag card stock.  I put it on my
Stick & Stamp Mat and, using the Wood stencil, I stenciled the panel with
Orange Chroma Glaze.  I set that aside to dry.
to stencil the panel with.


When it was completely dry, I inked the edges with Simon Hurley's
Weeping Willow Ink.


Using 3 different pieces of mirror car stock, in gold, copper, and rose
gold, I die cut all 5 leaves of the Fall Leaf Die Cut Set.  I had 15 total.


I laid them out and then applied alcohol ink to them using 2 shades of
orange, cranberry and dark brown varying the color combinations.


I took my stenciled panel and adhered it to an A2 size top folding card base
of Lunch Bag card stock that had a piece of darker brown card stock adhered
to it.  I placed my leaves around 3 edges - top, left and bottom.  Once
they were all adhered I trimmed them.


I stamped my sentiment from the No Place Like Fall Add-On Stamp Set
and dark brown embossing powder.


I trimmed it and adhered it along the middle of the right side.  I added
gold confetti to finish my card!


I hope you enjoyed today's tutorial!  There are so many products that
can be used for fall cards.  Find them at


Thanks so much for stopping by today!

Betsy

In my capacity as a design team member for Brutus Monroe, I do receive the products I use from them. 

All opinions and creative decisions remain my own, and I only work with companies/use products that I love.


Tuesday, January 18, 2022

Fallen Hearts with Brutus Monroe


Hello everyone!  If it's chilly where you are I hope you are able to keep warm!
Today I'm sharing this beautiful love card with products from


This card came together very easily.  And I love the effect that the Chroma
Glaze gives.  Let me show you how I made my card!
I had previously made some alcohol ink panels with plum and pink on
mineral paper.  Mineral paper is quite thin.  I cut it down to an A2
size card.


Then I took my Fallen Hearts Stencil and using Silver Chroma Glaze
stenciled it onto my inked panel.


The Chroma Glaze goes on very opaque, but when dry it's translucent and
the metallic really comes to life when it's dry.  I used the lower half of
the stencil where the hearts get very random.  For a sentiment on my card
I used the "Love" from the Heart Petals Cutting Dies Set.  This has a
shadow layer but I didn't use it.  I just cut the word from Vineyard card stock.
I adhered my stenciled panel to an A2 size white card base.


It was about this time I noticed the mineral paper was not laying down
smooth with the liquid glue I applied it with.  I honestly thought I ruined my
card.  The buckling was epic!!!!  I took a piece of copy paper, folded it in half, 
 laid on top of the card and burnished it with the wide side of my 
teflon bone folder.  I left it overnight and in the morning it was
perfectly flat.  Whew!  I adhered my sentiment at an angle and ran a
shimmer pen over it.  That finished my card!


This is such a simple and elegant card elevated by the use of the
Chroma Glaze on top of the alcohol ink!  Bit of a learning curve with
the mineral paper, but it all looks so great!  You can find the
products I used at


Thank you so much for taking time to stop by today!

Betsy

In my capacity as a design team member for Brutus Monroe, I do receive the products I use from them.

 All opinions and creative decisions remain my own, and I only work with companies/use products that I love.


Tuesday, January 11, 2022

Sweet Candy with Brutus Monroe


Hello everyone!  Today it's all about the candy!  Yummy!  I'll be
using products from


What a fun colorful project!  Let me show you how I made my card!
I firs took a piece of Aqua Pigment Watercolor Paper and taped it to
a hardboard.  I was mindful to make sure my tape was straight and 1/8"
covering so it would trim down evenly.  I used the Oval Simple Blend
and taped the oval to the middle of the panel for a mask.


I wanted to be able to splatter my background.  Using a #2 fan brush I
splattered with the Yellow Orange Aqua Pigment first.  I let this dry
thoroughly before splattering with the next color.


I did take care to wipe up some of the splatter that was on the
oval mask.  I moved on to my darkest color which was the blue.


I next used Green with a bit of the Yellow Orange mixed in to make it a bit
more lime colored.  I used Yellow Orange with a bit of Red for an orange
color and I used White Chroma Mist mixed with Red for a pink.  Then to the pink
I mixed a bit of the Blue for a purple.  I dried in-between each color.


I was really pleased with the look of this.  I trimmed this panel down to
3 3/4" x 5".  I next heat embossed with Raven Sparkle Embossing Powder
the candy tree from the stamp set and the edges of a black card stock
panel that I cut to 4 1/8" x 5 3/8".


I adhered both panels to a white standard A2 size top folding card base.
On another piece of the Aqua Pigment Watercolor Paper I stamped out 
the candy elements from the stamp set twice.


Using the same color mixes with the Aqua Pigments I painted my
elements.  I did not paint the little round bubbles.


I fussy cut these elements except for the bubbles.  Next I took these same stamps and stamped
them on my background - mainly for placement but this is how I got my little
bubbles onto the background without having to cut them out.  I also stamped
my sentiment at the same time.  I placed my heart lollipop onto the panel
just so I would make sure I had enough room for it.


I painted the elements on the tree itself using the same mixes
of Aqua Pigments.  I foamed taped the fussy cut elements.  I used
Liquid Pixie Dust on the bubbles.  On the painted elements I used
a shimmer pen.  Then as a final embellishment I used Glossy Accents
on all of the painted elements.  And that finished my card!


What a fun colorful card to make!  And a sweet way to say
"Hello" to a friend!  You can find the product that I used at


Thank you so much for stopping by and taking an interest.
I appreciate your time!

Betsy

In my capacity as a design team member for Brutus Monroe, I do receive the products I use from them. 

All opinions and creative decisions remain my own, and I only work with companies/use products that I love.


Wednesday, October 13, 2021

Fall Leaves with Brutus Monroe


Hello everyone!  Fall is here and the leaves are so colorful!  I wanted
to create a fall woods vibe with my card today!  I'll be using products from:


Let me show you how I made my card!  I knew I wanted to use the
Chroma Glaze with a stencil, so I did that first.  I used a piece of the
Mustard Seed card stock and stenciled on Chroma Glaze using the
Basket Weave Stencil.


This Chroma Glaze is cloudy when it's wet, but it dries translucent. 
  This was going to take a while to dry, so I set it aside and next die cut my leaves.  
I used 3 different plaids from the paper collection...they are gorgeous!  Next I
 created my A2 size card base. I used a dark brown pigment ink and clear
embossing powder and stamped out the sentiment.  This sentiment
comes from the Fall Prairie Stamp Set.


When my stenciled panel was dry I cut it down to 2 1/2" x 5 1/8".
I adhered a piece of twill ribbon across the bottom of the panel with
double sided tape. 


 Then I adhered the panel to the card base with foam tape.


I tucked 2 of the leaves into the top of the twill ribbon, adhering 
them flat.

I adhered the maple leaf onto the front of the card, using foam tape
where necessary.


I had a piece of pale orange twine in my stash and I used it to make a
tiny bow for the stem of this leaf.


I adhered some autumn toned gems on and around the leaves.  I
added 3 tiny ones over the "i's" in the sentiment.


I love the colors and textures I could get using products from

          Brutus Monroe

I hope you enjoyed today's tutorial.  
 Thank you so much for stopping by!

Betsy

In my capacity as a design team member for Brutus Monroe, I do receive the products I use from them.

 All opinions and creative decisions remain my own, and I only work with companies/use products that I love.