Showing posts with label Inspiration Box. Show all posts

Tuesday, October 18, 2022

Baked Fresh with Brutus Monroe


Hello everyone!  I don't know about you, but I love the smell of fresh baked
bread!  That warm yummy smell just hits the spot!  So today I'll be using
products from


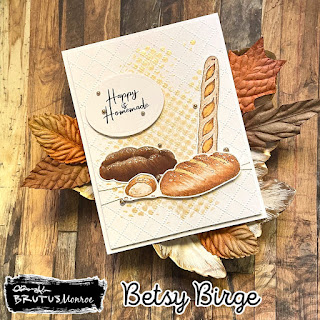
I tried something a little different with this card.  I stenciled over an embossed
background!  It wasn't perfect but I like it!  Let me show you how I made it!
I first cut a panel of White Wash card stock to 4" x 5 1/4"and embossed it with an 
embossing folder from my stash.  Then I put it on my Stick and Stamp Mat
and used the Circles Stencil and Gold Chroma Glaze.  I didn't want full
coverage so I didn't put it all over my panel.  But what did happen was the
panel had raised edges from the embossing and in places it left almost a
double circle look.  I really liked the look it gave.


While I was waiting for that to dry, I stamped my elements for my card
from the Baked Fresh Stamp Set with some soft brown Copic-friendly ink.
I stamped my sentiment in dark brown pigment ink away from the other
elements so I could die cut it.


For the coloring of my elements I Google Imaged "Artisan Bread".  This
gave me the imagery that I needed for color.  I used various browns and tans and a
bit of desaturated yellow for the breads. 


 I also tried to give the bread some visual texture, so my coloring
was not straightforward.  I did some dotting and left areas without much
color.  I was fairly happy with how they looked.  I fussy cut these out and
die cut the sentiment with an oval die.


My stenciled panel was dry.  I made a card base using the same White Wash
card stock.  It's an A2 size top folding base.  I put foam behind my stenciled
panel and before laying it down I added some gold thread and wrapped it around
the lower part of the card.


You can see the thread is not straight.  I added this for a slight
grounding of the elements, but not representative of a surface like
a table top.  I adhered 2 of the breads flat to the surface but popped up
the one in the front on foam tape as well as the sentiment.  I added
some light chocolate pearls that really reflect the gold stenciling and thread .
As a last bit of detail, I added just a few white hi-lites with a white
Posca Pen and then with a fine black marker added black dots that
resemble poppy seeds.  And my card was done!


I really like how this card came out.  I love the gold Chroma Glaze with
the colors of the breads and I think they enhance each other.  The Baked
Fresh Stamp & Die Set are part of October's Inspiration Box.  You can
find the products I used at


Thanks so much for stopping by!  I hope I've inspired you to create
some beautiful!

Betsy

In my capacity as a design team member for Brutus Monroe, I do receive the products I use from them. 

All opinions and creative decisions remain my own, and I only work with companies/use products that I love.




Tuesday, April 12, 2022

Bountiful Blooms with Brutus Monroe


Hello everyone!  I'm bringing you a bit of spring today - at least in
my card!  I'll be using new products from


How cute is this card!  This stamp set is chock full of images to make the
cutest scenes!  It comes in the April 2022 Inspiration Box!  Let me show you how I 
made my card!  I started with the fence.  I used the Fence Builder Die Set and  Farmhouse
 Grain card stock.  I used the long piece twice and I die cut 7 smaller posts.  Using the
Stick & Stamp Mat I placed these on and then painted them with Brown
Aqua Pigments.


I was also using the Stick & Stamp Pigment Palette while making
my project.  It was very handy.  These looked too pale to me so I added a
touch of Black Aqua Pigment to the Brown.  Then, when they were
completely dry, I ran Simon Hurley's woof! ink pad over the pieces.
This really picked up the woodgrain texture in the paper!


I set those aside and chose the stamps I wanted to work with.  There are
33 stamps in this set!  I used waterproof ink and Aqua Pigment Paper.


I knew I would be fussy cutting these so it didn't matter where I stamped 
my images.  Still using the Stick & Stamp Mat with the Pigment Palette,
I started painting my images.  I used Yellow Orange, Green, Tinsel Blue,
Red, Brown, Black and White.


I did some mixing of colors for an orange, purple and skin tone.


I set those aside to dry before fussy cutting them.  Next I cut a panel
of watercolor paper that was 4 1/8" x 5 3/8".  Once again I put this on my
Stick & Stamp Mat.  With my Tinsel Blue Aqua Pigment I painted
across the top two thirds of the page.  While it was still went I went 
across the bottom with the Green mixed with some Yellow Orange.
I used sideways brush strokes to do these and I didn't overwork these
areas.


Once that was dry I stamped my sentiment.


I adhered my fence down first.  I placed the horizontal posts and then adhered
my vertical posts spacing them evenly across the panel.


Next I adhered my other little elements.


I felt the grass area needed some texture so I made little grass blades with my
paintbrush and the same green mixed with yellow.


After that was dry I popped up the panel on foam and attached to a Buttercream
card stock base.  Then I popped up my Garden Lady and attached her to the
card.  For a bit of embellishment, I used Fallen Snow Glitter Glaze and a
Q-tip and made little dots of it around the flowers and watering can.  I also added
a little bit to the butterflies and the bird.
And that finished my card!


I hope you enjoyed today's tutorial.  This stamp set has so many stamps
and matching dies that you could make so many little scenes and cute cards!
Find the products I used to day at


Thanks so much for stopping by today!

Betsy

In my capacity as a design team member for Brutus Monroe, I do receive the products I use from them.

 All opinions and creative decisions remain my own, and I only work with companies/use products that I love.


Wednesday, May 5, 2021

Reach For The Stars with Brutus Monroe


Hello everyone!  The May Inspiration Box is here from


This Inspiration is jammed packed full of spacey goodness and fun!
Let me show you how I made my slimline card!
The first thing I did was to chose and prepare my background paper.
I chose the Watercolor Galaxy Paper Collection.  However, it is only
6" x 6".  So I cut it directly down the center and used a piece of
1/2" Brutus Monroe Tissue Tape to keep the ends butted together.
I didn't remove the release paper at this time.  I trimmed the ends so
my finished panel measured 3" x 8".


Next I needed to make the base for my little astronaut to stand on.  I
chose a piece of dull yellow card stock and on one end of it, drew an
arc and cut it out.  


I wanted to use both the Daffodil Chroma Glaze and the Neon Yellow
Chroma Glaze for texture.  So, taking the tip of a palette knife, I
applied the Daffodil first.  I applied it sort of thick - thick enough so
my knife skipped over the surface of the card stock.  Then to give
it more texture I tapped my finger into the wet glaze.


Without waiting for the Daffodil Glaze to dry I applied the Neon Yellow
Glaze in the same manner applying more at the top of the arc.


I set this aside to dry.  I next stamped my sentiment onto the upper
right corner of my patterned paper curving the stamp a bit and heat embossed it with
Alabaster Embossing Powder.  I backed the patterned paper panel with
a very dark blue card stock and adhered it onto my  3 1/2" x 8 1/2" card base that
was covered with silver glitter card stock.


Next I stamped my images with Raven Detail Ink.  I used 5 of the images -
 4 planets plus the little astronaut.


I originally planned on only 3 planets but added in the 4th one
later on in my process.  I colored my images with Copic markers.


Copic markers used:

Red:  R05, R17, R59, R20
Violet: V12, V05, V09
Blue:  BG15, B49, B32, B63
Yellow:  Y15, Y38
Grey:  C1, C3, C5
Brown:  E21, E3, E35
Blender & Black

After these images were colored I fussy cut them and used a black
water-based marker around the cut edges.  I did leave a very
narrow white outline around the little astronaut.
By this time, my glazed piece was dry.  To accentuate the
texture and give it depth, I first blended Simon Hurley
Woof ink with a blending brush and to the very top curve
of the arc I used Alabaster Pigment Ink to hi-lite.  Then I adhered
it to my card base.


Using a die from my stash I die cut various size stars from
the left over silver glitter card stock.  I adhered my little astronaut
with foam tape and glued the planets down flat.  Then I
adhered the stars.  Using a Gel Roll Stardust pen I accented the
planets and bits on the astronaut suit, helmet and flag.  I also
added touches with a white gel pen.  I used Glossy Accents on the face 
of my astronaut to make it more like a helmet and my card was done!


I had so much fun creating this card!  And I was really pleased with
how my moon base turned out!  Those Chroma Glazes are
Out of This World!!!!!!!!!  You can find the supplies I used for
my project today at:


The Inspiration Box is a subscription product.  Find it along with all
of the other subscription products here.

Thanks so much for stopping by.  I hope I've inspired you today to
create something you love!

Betsy

In my capacity as a design team member for Brutus Monroe, I do receive the products I use from them.

 All opinions and creative decisions remain my own, and I only work with companies/use products that I love.