Showing posts with label Rainbow Sparkle Embossing Powder. Show all posts

Tuesday, June 28, 2022

Painted Rainbow with Brutus Monroe


Hello everyone!  Today I'm continuing the rainbow theme with products from


This was so much fun to make - especially working with all that sparkly goodness
found in the Candy Coat!  Let me show you how I made my card.  I started my card using
a piece of 110lb white card stock that was cut to around 4" x 8".  I wanted plenty
of room to work with.  Using my Stick & Stamp Mat and the Painted Rainbow 
Stencil, I used Candy Coat as my medium.  I used Pink, Yellow, Green Teal
and Purple.  To make the orange I mixed Yellow and Pink and to make the blue,
I mixed Teal and Purple.


I let this dry overnight.  I had applied the Candy Coat quick thickly for good
coverage and bright color so it took a while to dry.  When it was dry I cut the
panel to 2 3/4" x 5 3/4".  I made a 3" x 6" mini slimline card base and 
adhered a piece of hot pink holographic paper to it just an 1/8" smaller. Using 
some heat resistant acetate I stamped my rainbow images and shooting
star and sentiment with black pigment ink.  Then I used Rainbow Sparkle
Embossing Powder to heat emboss.  Super easy to cut out and you really don't
see the edges in the finished project! 


 I backed my stenciled piece with 3
layers of the 110lb card stock.  I did this to give it dimension but to also
ensure that the stenciled piece didn't warp the entire front of my card.  It
made the card super stable.


With the rainbows and star from the Radiant Rainbow Stamp Set I was able to trim
out my images and then actually flip them over before adhering.  This made for a
crisper image, but you  can still see the sparkle from the embossing powder.  I
adhered these elements flat to the surface and my rainbow card was done!


I hope you enjoyed today's fun rainbow tutorial.  Everyone should have some sort
of rainbow collection in their stash and this stencil is awesome!  Find it and the
other products I've used at


Thank you so much for stopping by!  Have a great week!

Betsy

In my capacity as a design team member for Brutus Monroe, I do receive the products I use from them. 

All opinions and creative decisions remain my own, and I only work with companies/use products that I love.


Tuesday, June 21, 2022

Radiant Rainbow with Brutus Monroe


Hello everyone!  Hope everyone is having a great start to their summer!  Today
I get to bring you a fun project using products from


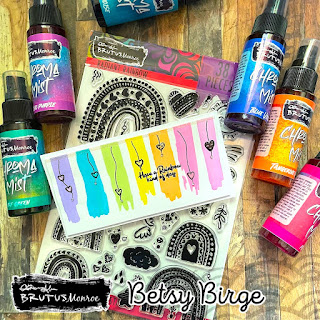
This is such a pretty card and so easy to make!  Let me show you how I made it!
I started by taking a piece of heavy weight white card stock that was cut to
6" x 4".  I laid it on my Stick & Stamp Mat.  I used the Painted Rainbow Stencil 
and a 1/2" flat damp brush, I sprayed Chroma Mists onto my work surface, picked it 
up with my brush and painted each stripe on the rainbow.  One or two swipes of the 
brush was all I did, as I didn't want any of the Chroma Mists to seep under the stencil.


Once this was dry, I cut the panel so it was 2 3/4" wide.  With the left over
piece of stenciled card stock I used a zig zag die and I ended up placing this
inside my card.  I also cut the black bow but decided not to use it.  The colors
of Chroma Mists were: Lilac Purple, Pink, Yellow Orange, Leaf Green,
Turquoise and Blue Violet.  They make such a pretty rainbow!  I next
heat embossed my sentiment from the Radiant Rainbow Stamp Set
using black pigment ink to stamp and then heat embossed with Rainbow 


I decided to use the small hearts from the stamp set and hang them on each
of the rainbow stripes.  I, once again, used black pigment ink to stamp them.
I then drew a line connecting them to the top with a black pen.  I laid a
yellow sparkle peel-off across the top of the card.  


I used a shimmer pen on each one of the hearts, then filled them in with
Glossy Accents.  I put a clear iridescent tiny gem stone on the end of 
the strings and my rainbow card was finished!


I hope you enjoyed today's easy tutorial!  It doesn't have to be
complicated to get the message across to your recipient!  Find
the products I used here today at


Thanks so much for stopping by today!

Betsy

In my capacity as a design team member for Brutus Monroe, I do receive the products I use from them.

 All opinions and creative decisions remain my own, and I only work with companies/use products that I love.