Every day greeting cards and how they are created with step-by-step instructions.
Showing posts with label Brutus Monroe Card Stock. Show all posts
Showing posts with label Brutus Monroe Card Stock. Show all posts
Wednesday, September 1, 2021
Saturday, August 7, 2021
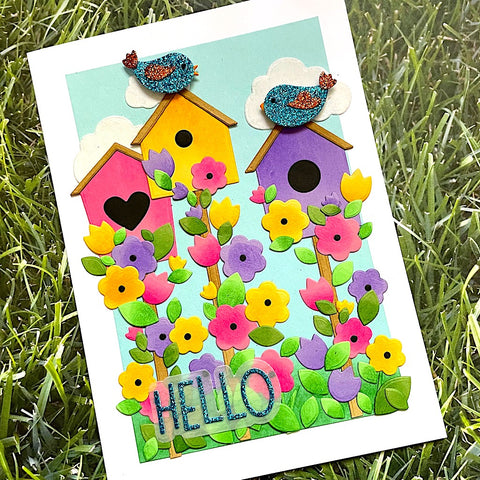
Birdhouse Scene Builder with Brutus Monroe

Hello Brutus Monroe fans! Today I'm sharing this
super fun card using the Birdhouse Scene Builder Die Set! If you are new to scene building with dies you are in for a treat with this Birdhouse Scene Builder die set! So many ways to use these dies. Let me show you how I created this fun scene!
I first picked out all of my card stock. I had a pretty good idea of how I wanted this project to look - bright and fun - so I chose card stock that reflected that.

I wanted plenty of room to place my elements, so I chose to make a 5" x 7" card and made a base from white card stock. My aqua panel would be my "sky" and I cut that to 4" x 6"...knowing that I would place my bits and pieces on and outside that panel.
I next die cut all of my pieces...there were a lot! Once I had them die cut, I
inked them to give a bit of depth.

I used a matching Simon Hurley Ink to do all of my ink blending. And used small ink blending brushes. I didn't end up using all of the pieces, but close!

I used Glitterstock for my birds so I did not ink blend them. Once all of these pieces were done, I ink blended the aqua background panel with some green at the bottom and I die cut a few puffy clouds.

Next it was time to start adhering down my elements, I start with the birdhouses.

I added the bird holes, birds and flowers next.

I added the leaves next. I also used the Slimline Sentiment Die set for my greeting. I die cut the shadow from vellum and the letters from Glitterstock.

I finished up by adding the wings on my birds. I could have kept going with bling white gel pen, etc. But sometimes you just have to stop. I didn't want my project to get too overcrowded and confusing to look at.

I hope you enjoyed my project today! Super fun to make!
Betsy
Brutus Monroe products used:
Birdhouse Scene Builder Cutting Dies
Slimline Sentiments Dies
Glitterstock
Color Companion Card Stock
In my capacity as a design team member for Brutus Monroe, I do receive the products I use from them.
All opinions and creative decisions remain my own, and I only work with companies/use products that I love.
Tuesday, October 27, 2020
Autumn - 4 Seasons
Hello Quietfire fans! It's Betsy here today sharing with you this lovely
autumn card using
This is such a lovely set of dies and the "Autumn" die is just perfect for this time of year!
Let me show you how I made my card!
I first started out with a piece of 140lb watercolor paper. This paper was a sample set that had every kind of watercolor paper that this company makes. I lightly sprayed it with water. Then I sprinkled on - very lightly - PaperArtsy Infusions in Olive Tree and Golden Sands.
These pigments are like ColorBurst pigments and are very strong. I really wanted to retain the mottled look you get when you first sprinkle them on wet paper. I allowed this to dry thoroughly. Then I took my "Autumn" die and die cut the word. I already had my paper chosen.
I love the effect I get with the pigments on this die cut. Next I gathering all of my supplies
together that I would be using.
My paper comes from Kaisercraft "Fallen Leaves" collection and I really felt the color
palette was sophisticated and blended well with the die cut.
My card base was from Brutus Monroe called "Martini" card stock - it's a lovely olive color. I cut that
to 5 1/2" x 8 1/2" and scored and folded it in the middle. My darker patterned paper
measures 4 1/8" x 5 3/8"I adhered that down first. My next patterned paper measures
3 1/2" x 4 3/4". Before adhering it to the base, I inked the edges with Antique Linen
Distress Ink.
This gives the edges just a bit of definition. I also inked the little flag. I adhered down
the patterned piece and the flag with the addition circle piece on it.
Before adding my
die cut "Autumn" to my card I cut it out 3 times out of a golden color card stock scrap.
I stacked these together and then adhered them to my project. And that finished my card!
I decided against any embellishments...I liked the softness and elegance that it had.
I hope you enjoyed today's tutorial! You can find these dies and more at:
Thanks so much for stopping by today!
Betsy
Subscribe to:
Posts (Atom)


