Tuesday, January 25, 2022

Heart Petals with Brutus Monroe


Hello from the cold Northeast everyone!  Today I am sharing this ultra-shiny
project with products from


I went over the top with the sparkle and shine on this card!  We have had gray
cold days here and I needed a good dose of something sparkly!  Let me
show you how I made my card.

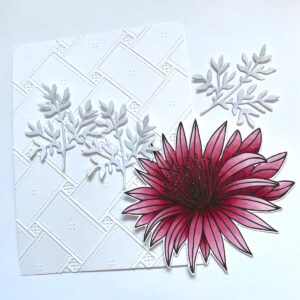
I first took 2 pieces of Glitterstock in Silver.  I had already chosen
my background paper from the Watercolor Galaxy Paper Collection.  Using a
palette knife, I spread Fallen Snow Glitter Glaze  and
Mermaid Chunky Glitter Glaze on the Silver Glitterstock.


You can see I did not spread it on thickly as I wanted some of the Glitterstock
to be seen.  And, I didn't get it on evenly either and that was ok.  I did do this
a day ahead of time.  I needed these panels to be very dry.  


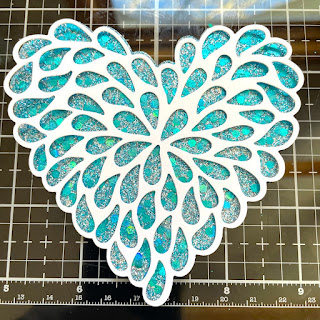
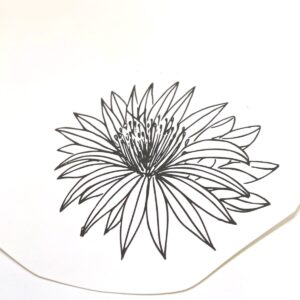
Using the outline die, I cut the image from the Mermaid Chunky Glitter Glaze.
I next cut the inside using both of the dies from plain white card stock.  I needed
a way to be able to place my silver pieces that form the inside.


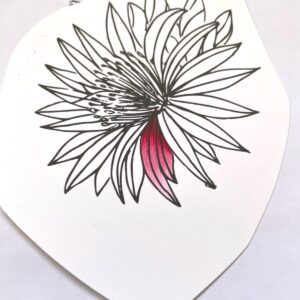
You can see my die cut in the upper right.  I was poking out a few pieces at a
time and gluing them in using the white stencil I had made.  I was using liquid
glue so I was also lifting up the stencil away from the pieces I had just glued
so that nothing stuck that I didn't want there.


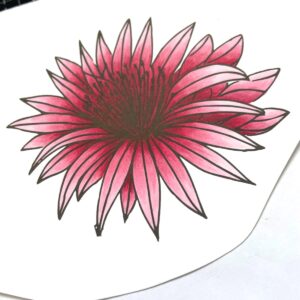
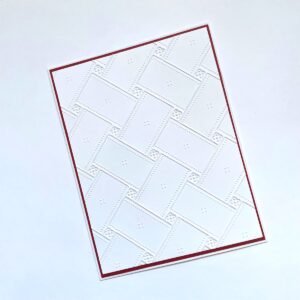
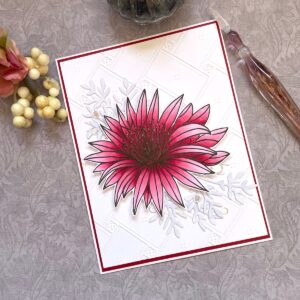
I was pleased with how this turned out!  I covered the front of a standard
A2 size top folding white card base with a sheet of paper from the
Watercolor Galaxy Paper Collection.  I die cut the letters XO from the
Heart Petals Die Set.  I didn't cut out the shadow...just the letters from
some Turquoise Glitterstock.


I placed the heart at an angle and adhered it flat to the card and I
adhered the 2 XO's above it at an angle...also flat to the card.  And
that finished my super sparkly project!


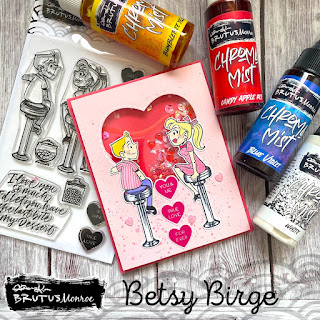
This was so much fun to make with the shiny goodness going on!  You can
find the products I used for this card at


Thank you so much for letting me inspire you!

Betsy


In my capacity as a design team member for Brutus Monroe, I do receive the products I use from them. 

All opinions and creative decisions remain my own, and I only work with companies/use products that I love.


Monday, January 24, 2022

Hello There with Joy Clair Designs


Hello everyone! Today I'm sharing the Hello There Digital Stamp Set from Joy Clair Designs.  This is a beautiful single floral image with some great sentiments.  Let me show you how I created my card!

I started by printing out the main image onto Neenah 80lb. Classic Crest Solar White card stock.  I was unsure if I was going to be using a sentiment from the set or not.  I did print out a few but in the end decided not to use them.

Since this was my main image, I really wanted it to stand out.  I decided to use a dark pink/red.  I knew I could get the deep colors I was going for.

I was really please with these first few petals.

The Copic colors I used:

R81, R83, R85, R37, R89

I wanted to mount this blossom on a white background, so I decided to emboss my white card panel that measures 4" x 5 1/4".  This gives a subtle backdrop for the drama of the flower.  I adhered this embossed panel onto a top folding A2 size white card base that had a panel 4 1/8" x 5 3/8" of deep red adhered to it.

The card needed just a bit more so I used a foliage die from my stash and colored them with my C1 Copic marker.  This gives the eye a bit of a rest from the single flower.  I fussy cut my colored flower.

I adhered the foliage down flat to the card and popped up the floral piece with foam tape.  Once I had the card put together I felt it needed just a little sparkle.  I added some Sparkling Clear Confetti from Pretty Pink Posh and then I took a  Gelly Roll Stardust Pen and gently went over the lines in the middle of the flower.  I went really lightly with the pen.  But it faintly brings the center of the flower into view without being overwhelming!  And that finished this gorgeous card.  I can use it for any occasion!

I hope you enjoyed today's tutorial!  Such a beautiful image and can be used for so many different things!

Thank you so much for stopping by today!

Betsy

In my capacity as a design team member for Joy Clair Designs, I do receive the products I use from them. 

All opinions and creative decisions remain my own, and I only work with companies/use products that I love.

Tuesday, January 18, 2022

Fallen Hearts with Brutus Monroe


Hello everyone!  If it's chilly where you are I hope you are able to keep warm!
Today I'm sharing this beautiful love card with products from


This card came together very easily.  And I love the effect that the Chroma
Glaze gives.  Let me show you how I made my card!
I had previously made some alcohol ink panels with plum and pink on
mineral paper.  Mineral paper is quite thin.  I cut it down to an A2
size card.


Then I took my Fallen Hearts Stencil and using Silver Chroma Glaze
stenciled it onto my inked panel.


The Chroma Glaze goes on very opaque, but when dry it's translucent and
the metallic really comes to life when it's dry.  I used the lower half of
the stencil where the hearts get very random.  For a sentiment on my card
I used the "Love" from the Heart Petals Cutting Dies Set.  This has a
shadow layer but I didn't use it.  I just cut the word from Vineyard card stock.
I adhered my stenciled panel to an A2 size white card base.


It was about this time I noticed the mineral paper was not laying down
smooth with the liquid glue I applied it with.  I honestly thought I ruined my
card.  The buckling was epic!!!!  I took a piece of copy paper, folded it in half, 
 laid on top of the card and burnished it with the wide side of my 
teflon bone folder.  I left it overnight and in the morning it was
perfectly flat.  Whew!  I adhered my sentiment at an angle and ran a
shimmer pen over it.  That finished my card!


This is such a simple and elegant card elevated by the use of the
Chroma Glaze on top of the alcohol ink!  Bit of a learning curve with
the mineral paper, but it all looks so great!  You can find the
products I used at


Thank you so much for taking time to stop by today!

Betsy

In my capacity as a design team member for Brutus Monroe, I do receive the products I use from them.

 All opinions and creative decisions remain my own, and I only work with companies/use products that I love.


Friday, January 14, 2022

Full Heart with Joy Clair Designs


Hello everyone!  Betsy here with my first blog post for Joy Clair Designs!  I am so excited and feel honored to be a part of this wonderful team!

For my first project I was very inspired by the new Pantone Color of the Year - Veri Peri.  I paired it with the gorgeous Full Heart digistamp.  The 2 together are simply gorgeous!  Let me show you how I made my card!

I started by printing my heart image and sentiments onto hot press watercolor paper.


I only have an inkjet printer - so nothing special.  I did print my image out the night before and  I think that gives the ink some time to cure.  I used a Watercolor Brush Pen from Altenew called Persian Blue  from their Winter Wonderland Collection.  I chose my background paper - a sheet from Craft Consortium Ink Drops-Vivid.  The pen from Altenew really coordinated well with it.  I squirted some of the ink from the pen onto my glass mat, added water and picked it up with my paintbrush.  I gave the whole heart image a light wash of this color.  I did't leave it to settle into the paper or go over it a lot, just a quick light wash.  You can see it's not an even wash and it didn't need to be.

I next started shading it with the same marker only with no extra water.  I only did this on 3 of the roses.

I actually went even darker after these few petals were done as  I really wanted contrast.

I had plans for the fold-overs on the petals so I didn't shade those particular areas.

I used Violet watercolor from Zahra Ammar Art on Etsy for the fold over petals.  It gives the heart a little sparkle as it is a metallic paint and that color is so dreamy!

You can also see that my pen splattered when I took the cap off!!!!!  No worries.  I had plans to fussy cut this and even the smudge on the side would be hidden.  I took the violet paint and added a light glaze over the whole heart.  I did this by watering the paint way down and just going over the whole heart lightly.  I next fussy cut the heart and around the white edge I painted gold.  I used Persian Gold from Zahra Zammar Art.  It's gorgeous!

I put a wash of the Persian Blue over the sentiments and then a glaze of the Violet.

It still needed something so using a fan brush I splattered it with the Persian Gold paint.

I die cut these sentiments and backed them on gold mirror paper.  I also covered the front of of a standard A2 Size top folding white card with the gold mirror paper and adhered the panel of patterned paper that was cut to 4 1/8" x 5 3/8" on top.

Using foam tape I adhered my heart to the center of my card.  I adhered the sentiments to the top and bottom.  As a last embellishment I adhered small gold foiled pearls around the card.

This is such a gorgeous digistamp and can be used so many different ways! I was actually going to go with another layout when I started my project!...I'll save that for another time!  Look for this beautiful digital stamp and many others at

Joy Clair Designs


Thanks so much for stopping by!

Betsy

In my capacity as a design team member for Joy Clair Designs, I do receive the products I use from them.

 All opinions and creative decisions remain my own, and I only work with companies/use products that I love. 

Tuesday, January 11, 2022

Sweet Candy with Brutus Monroe


Hello everyone!  Today it's all about the candy!  Yummy!  I'll be
using products from


What a fun colorful project!  Let me show you how I made my card!
I firs took a piece of Aqua Pigment Watercolor Paper and taped it to
a hardboard.  I was mindful to make sure my tape was straight and 1/8"
covering so it would trim down evenly.  I used the Oval Simple Blend
and taped the oval to the middle of the panel for a mask.


I wanted to be able to splatter my background.  Using a #2 fan brush I
splattered with the Yellow Orange Aqua Pigment first.  I let this dry
thoroughly before splattering with the next color.


I did take care to wipe up some of the splatter that was on the
oval mask.  I moved on to my darkest color which was the blue.


I next used Green with a bit of the Yellow Orange mixed in to make it a bit
more lime colored.  I used Yellow Orange with a bit of Red for an orange
color and I used White Chroma Mist mixed with Red for a pink.  Then to the pink
I mixed a bit of the Blue for a purple.  I dried in-between each color.


I was really pleased with the look of this.  I trimmed this panel down to
3 3/4" x 5".  I next heat embossed with Raven Sparkle Embossing Powder
the candy tree from the stamp set and the edges of a black card stock
panel that I cut to 4 1/8" x 5 3/8".


I adhered both panels to a white standard A2 size top folding card base.
On another piece of the Aqua Pigment Watercolor Paper I stamped out 
the candy elements from the stamp set twice.


Using the same color mixes with the Aqua Pigments I painted my
elements.  I did not paint the little round bubbles.


I fussy cut these elements except for the bubbles.  Next I took these same stamps and stamped
them on my background - mainly for placement but this is how I got my little
bubbles onto the background without having to cut them out.  I also stamped
my sentiment at the same time.  I placed my heart lollipop onto the panel
just so I would make sure I had enough room for it.


I painted the elements on the tree itself using the same mixes
of Aqua Pigments.  I foamed taped the fussy cut elements.  I used
Liquid Pixie Dust on the bubbles.  On the painted elements I used
a shimmer pen.  Then as a final embellishment I used Glossy Accents
on all of the painted elements.  And that finished my card!


What a fun colorful card to make!  And a sweet way to say
"Hello" to a friend!  You can find the product that I used at


Thank you so much for stopping by and taking an interest.
I appreciate your time!

Betsy

In my capacity as a design team member for Brutus Monroe, I do receive the products I use from them. 

All opinions and creative decisions remain my own, and I only work with companies/use products that I love.


Tuesday, January 4, 2022

Love You More with Brutus Monroe


Hello everyone!  Can you believe it's a new year already?  I don't 
know about you but I'm ready for new and better year!  So, to kick
off January 2022 my project will be using products from


This Love You More Stamp Set is so cute!  I had to make a shaker
with it!  Let me show you how I made my card!
I first stamped my images with Raven Detail ink onto Whitewash card
stock.  I cut a light pink top panel to 4" x 5 1/4" and die cut a heart
shaker window.  This darker pink card stock in the photo will be my
card base.


I started my coloring with Chroma Mists.  I used Blue Violet, Bumblebee
Yellow, Candy Apple Red and White.I mixed the Red and White for my
pink areas and Yellow and White for their hair.  


For the skin tones I used Copics E51 and for the stools I used
C0, C3, C7 and 100.  I added a little R20 for their cheeks.


With a glitter gel pen I added stripes to the boy's shirt and polka dots
to the girl's dress.  I also added a bit of white gel pen around the
pupils of their eyes.  Once these were dry I fussy cut them. I also took
a smaller piece of the dark pink card stock to go behind the shaker
bits and sprayed it with an iridescent spray and then adhered it
into place.


 Now it was time for the base of the card.  Placing the evacuated heart back into
it's space to protect the piece of acetate I had adhered there, I splattered Chroma 
Mists that I had mixed - the Red and White - to make a matching pink.


Once that was dry I took out the evacuated piece and flipped over the
main panel to add foam tape.  I used 2 layers of the Brutus Monroe Foam
Tape.  I was going to use some rather chunky shaker bits and I wanted
them to shake freely.  I put a pile of shaker bits onto the base and then
gently placed my top over it.


For a sentiment I used 3 of the candy heart stamps in the set.  For
ink I used Simon Hurley's Prom Queen.  I stamped them on the light
pink card stock and then fussy cut them.


To finish I adhered my couple onto the card using liquid glue and
leaving enough room in-between so one of the candy hearts would
fit into the space, then I adhered the candy hearts vertically.  Finally I
adhered 3 puffy hearts (same ones used as shaker bits) around the
bottom of the card.


I hope you enjoyed the project today.  I had so much fun designing
and making this card!  You can find the products I used at


Thank you so much for stopping by today!

Betsy

In my capacity as a design team member for Brutus Monroe, I do receive the products I use from them.

 All opinions and creative decisions remain my own, and I only work with companies/use products that I love.


Alcea Hollyhock Flowers with Polkadoodles